

My mother and I’ve efficiently completed reupholstering my desk chair, and it turned out so good! It’s not good, but it surely’s fairly good for 2 non-professionals who do reupholstery initiatives possibly as soon as each three or 4 years.
Right here’s a have a look at the completed chair. Effectively, the upholstery is completed, however I’ve determined that I need to swap out the legs for a type of desk chair swivel bases, so these legs aren’t utterly on. If they give the impression of being wonky, attempt to look previous that. I’m nonetheless trying to find a fairly wooden swivel base on casters. So with that mentioned, right here’s a have a look at the completed reupholstered desk chair.
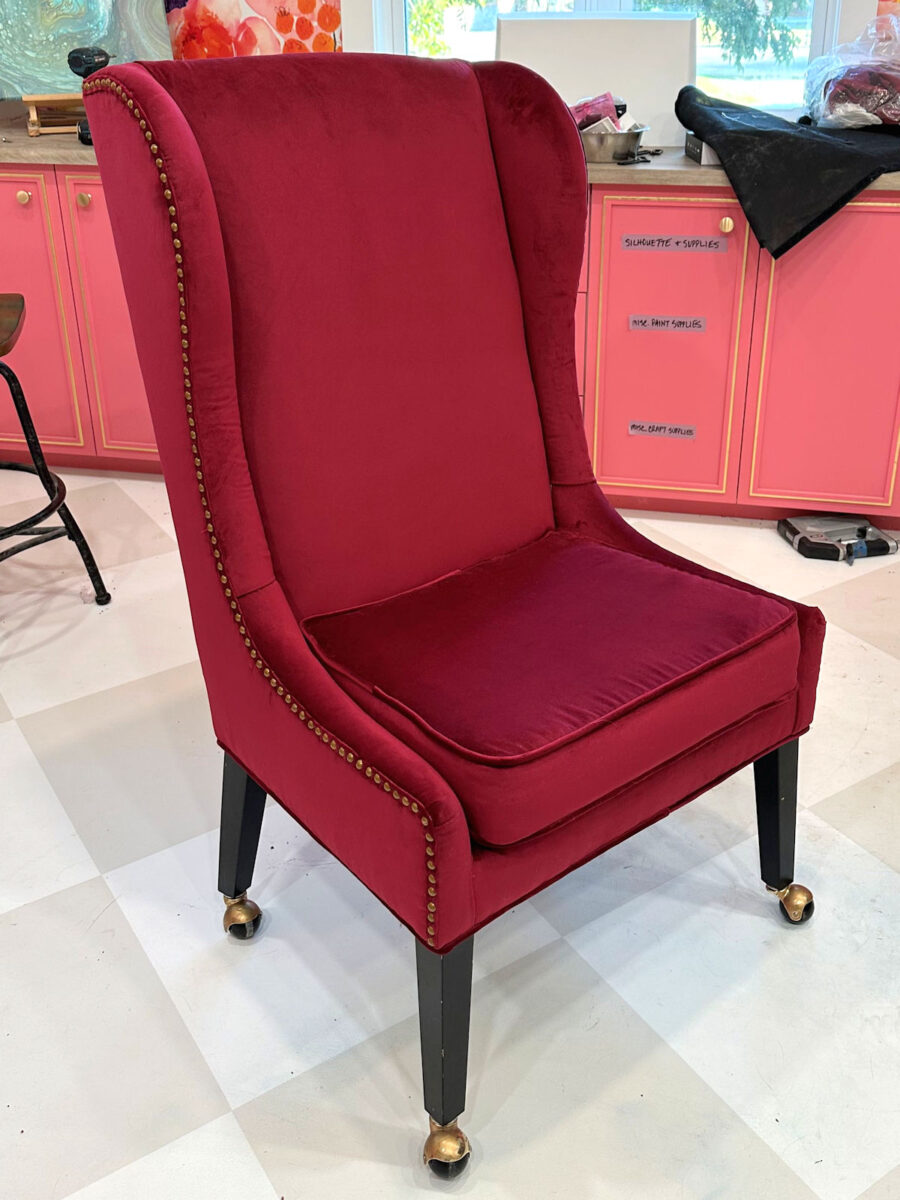
Right here’s a fast earlier than and after have a look at this chair.

So let me present you ways we completed up this chair. Once I left off yesterday, the chair regarded like this…

And I had this uncooked edge of material displaying throughout the arms, wings, and the highest of the chair again.

So at that time, we nonetheless wanted so as to add the trim, nail heads, and stitch the seat cushion. To make the flat trim to cowl the uncooked edges of the material, I lower strips of material to 1.5 inches huge, after which sewed them collectively end-to-end. In an effort to sew them collectively, I positioned the ends collectively at a 90-degree angle and pinned.

After which I sewed them collectively diagonally.

That gave me an angled seam like this. The explanation you need to sew the seam diagonally is in order that your complete bulk of a seam isn’t utterly in a single spot on the trim. This manner, the majority of that seam is unfold out over a bigger space, so it may be hid a bit simpler.

The trim for this half is only a flat trim, so there’s no cording wanted. I did a zigzag sew all alongside one fringe of the material to maintain my velvet from fraying, after which I folded the material into thirds lengthwise. First, I folded the uncooked, unstitched edge over…

After which I folded the zigzag stitched edge over that, ensuring that it overlapped the primary edge only a bit.

After which I sewed proper down the center. Right here’s what the entrance of that trim regarded like as soon as it was sewn.

With that trim sewn, I discovered the middle of the trim piece, and lined that up within the middle of the chair again and pinned it into place. After which utilizing my scorching glue gun, I rigorously connected the trim over the uncooked fringe of the material, ensuring to line up the trim in order that the sting of the trim was on the fringe of the wooden body. Since I used to be going to be including nailhead trim, I wanted this trim to be over the wooden body and never simply over foam and batting. Should you’re not including nailhead trim, you don’t should be as cautious about placement, you simply should be sure to’re protecting the uncooked edges of the material.

I continued working from the middle of the again, across the nook onto the wing, and down onto the arm till the entire aspect had trim protecting that uncooked edge.

After which I completed it by glueing the top of the trim beneath the chair and trimming off the surplus.

Then I repeated that complete course of, beginning on the middle of the chair again and dealing in the other way till the opposite aspect had trim protecting the uncooked edges on that complete aspect.
With the trim connected, I used to be prepared so as to add the nailheads. I solely ever use particular person nailheads. I don’t like these nailhead trim strips the place you add an precise nailhead about as soon as each 4 or 5 nails as a result of I can spot these a mile away. That product, in my humble opinion, won’t ever give knowledgeable look as a result of these precise nailheads each 5 or 6 spots are all the time a barely totally different coloration than the strips, they usually stick out like a sore thumb. So if I’m going to do nailhead trim, I’m going to take the time and do it the fitting manner.

You should buy instruments particularly made to make this course of simpler, however since I solely do upholstery about as soon as each three years or so, I haven’t spent cash on particular instruments. You want a spacer , a hammer, and one thing to carry the nailhead. For my spacer, I used just a few caught collectively nails that had been the right width. A tack hammer works the perfect, however I don’t have one, so I used my common hammer. And whereas I began off utilizing needle nostril pliers to carry my nailheads, I discovered that the nostril of my wire strippers labored so significantly better due to the flat form of the nostril which allowed me way more management over the nailhead as I hammer it in.

So whenever you’re not a professional, and also you don’t have the entire particular instruments, I’m very a lot a “use what you’ve acquired” form of particular person. A strip of nails, a wire stripper, and a development hammer labored simply superb and acquired the job performed.

Right here’s one aspect utterly finshed.
After the nailheads had been all connected, I wanted to complete off the trim by including coated cording across the backside of the chair. Masking cording is tremendous simple. Simply lower a strip of material about 1.5 inches huge, place the twine in the midst of the again of the material, fold the material across the twine, and stitch the 2 layers of material collectively as near the twine as doable. A zipper foot on the stitching machine works completely for this.

After which to connect this cording, I flipped the chair on it’s entrance in order that the underside of the chair was accessible, and I positioned the cording on the sting of the body…

After which used this cardboard strip to carry the cording, and stapled them each into place.

The aim of the cardboard is to maintain the cording from rolling again on itself. Should you attempt to staple cording on a chair like this with out utilizing the cardboard, you received’t find yourself with a clear, polished look. The cording will attempt to fold again and roll up on itself in areas, and also you received’t have a constant look throughout. The cardboard strip is available in a roll, and is obtainable at any upholstery store and at locations like JoAnn Materials.

The final remaining step was to make the chair cushion. I’m not going to do a radical tutorial on how you can make a cushion. I’ll say this. Should you don’t have any expertise stitching, the cushion may be a very good challenge to both rent out or do some bartering with a buddy who is aware of how you can sew. Stitching cushions with cording and a zipper isn’t a newbie challenge, particularly when working with thick upholstery cloth. However I’ll present you the essential idea right here.
For the cushion, you want a prime and backside piece, that are an identical. Then you definitely’ll want the sting strip that goes all the way in which across the fringe of the cushion. And then you definitely’ll want two lengthy strips of coated cording.
The strip that goes across the edge is make of three items of material plus a zipper. Piece 1 covers the entrance edge and a lot of the edge on all sides. Items 2 and three embrace a zipper, and this piece is lengthy sufficient to not solely cowl the again fringe of the seat cushion, but in addition to wrap round to the perimeters about two or three inches on all sides. So when you get piece 2 and three sewn along with the zipper, you clean it out in order that it’s flat, after which sew it to piece 1.

Set that apart after which work on the highest and the underside. You’ll need to connect the cording to the highest piece as a separate step, after which connect the cording to the underside piece as a separate step. In different phrases, don’t ever attempt to sew every little thing collectively (prime, cording, and edge piece) in a single step. Get the cording connected to the highest piece, after which sew on the sting piece. Sew the cording onto the underside piece first, after which sew on the sting piece. This image is my mother stitching the cording onto the highest cushion piece as a separate step earlier than even making an attempt to stitch the highest to the sting piece.

After which when you get all these items collectively, you have got a cushion cowl, and you may insert the cushion. And also you’ll most likely want an additional set of palms for that.
As soon as the seat cushion was performed, the chair was completed!
I’m so happy with how this turned out. The material is so deep and wealthy in particular person. I’m unsure if that’s coming throughout within the footage, but it surely’s such a deep purple with out being too darkish.

And with it being velvet, it’ll be simple to scrub when my cat sleeps on it, and I’m hoping she received’t be capable of shred this one since velvet appears to be a clawing deterrent for her.

I’m actually enthusiastic about discovering a brand new, fairly swivel base for this chair. I feel swapping these black legs for a fairly wooden swivel base will take it up just a few extra notches.

And eventually, right here’s a peek on the chair by my pink cupboards and behind my desk.

This can be a HUGE challenge that I can now mark off of my record! This was undoubtedly the most important challenge I nonetheless needed to do on this room, so it ought to a fast dash to the end line now.


Addicted 2 Adorning is the place I share my DIY and adorning journey as I rework and enhance the 1948 fixer higher that my husband, Matt, and I purchased in 2013. Matt has M.S. and is unable to do bodily work, so I do the vast majority of the work on the home on my own. You possibly can be taught extra about me right here.


")

