

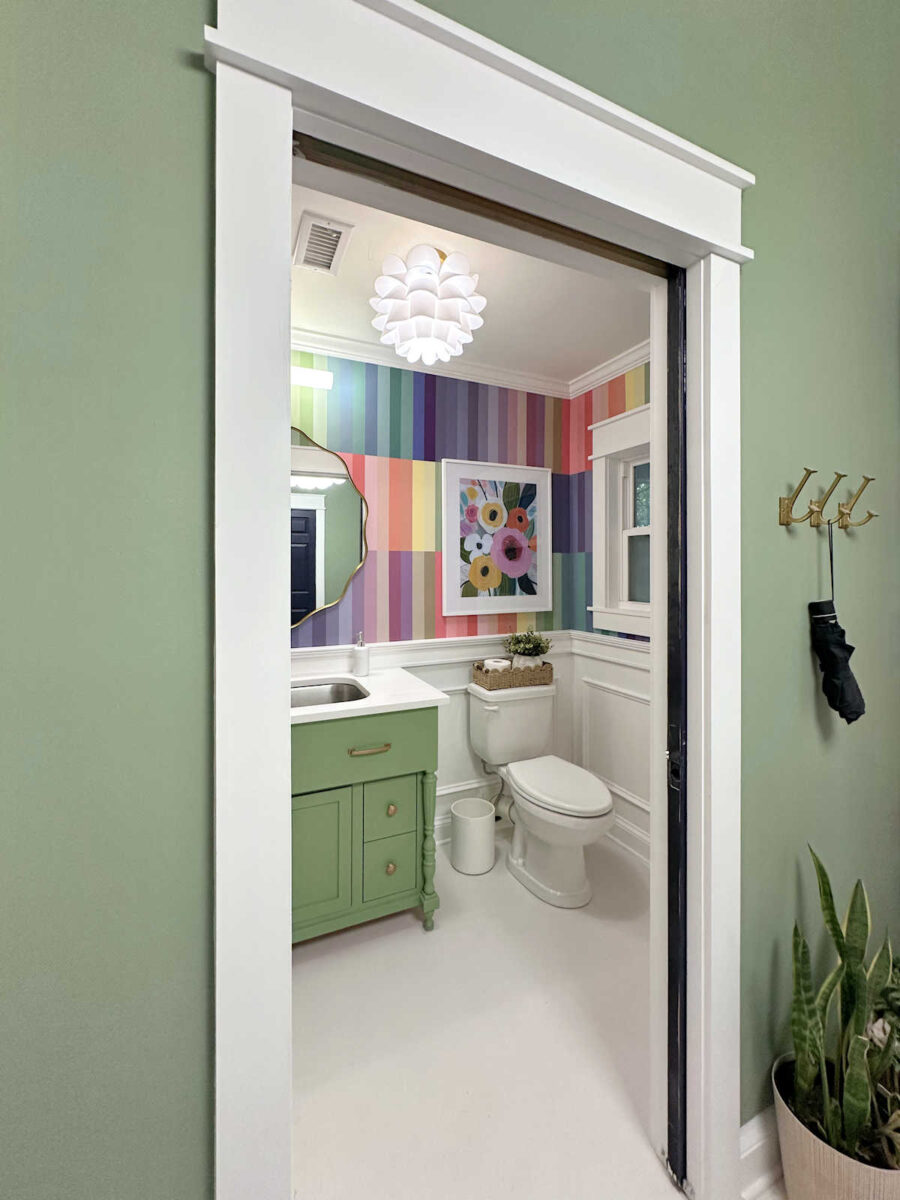
My studio half toilet is completed! And I couldn’t be happier with the way it turned out. This toilet is principally what my complete home would seem like if I weren’t married and didn’t have to contemplate the truth that I share this dwelling with an individual who doesn’t love shade as a lot as I do. 😀 However since that is the toilet in my studio, and Matt doesn’t get a say in how I enhance my studio, I used to be in a position to go slightly wild with the colour.
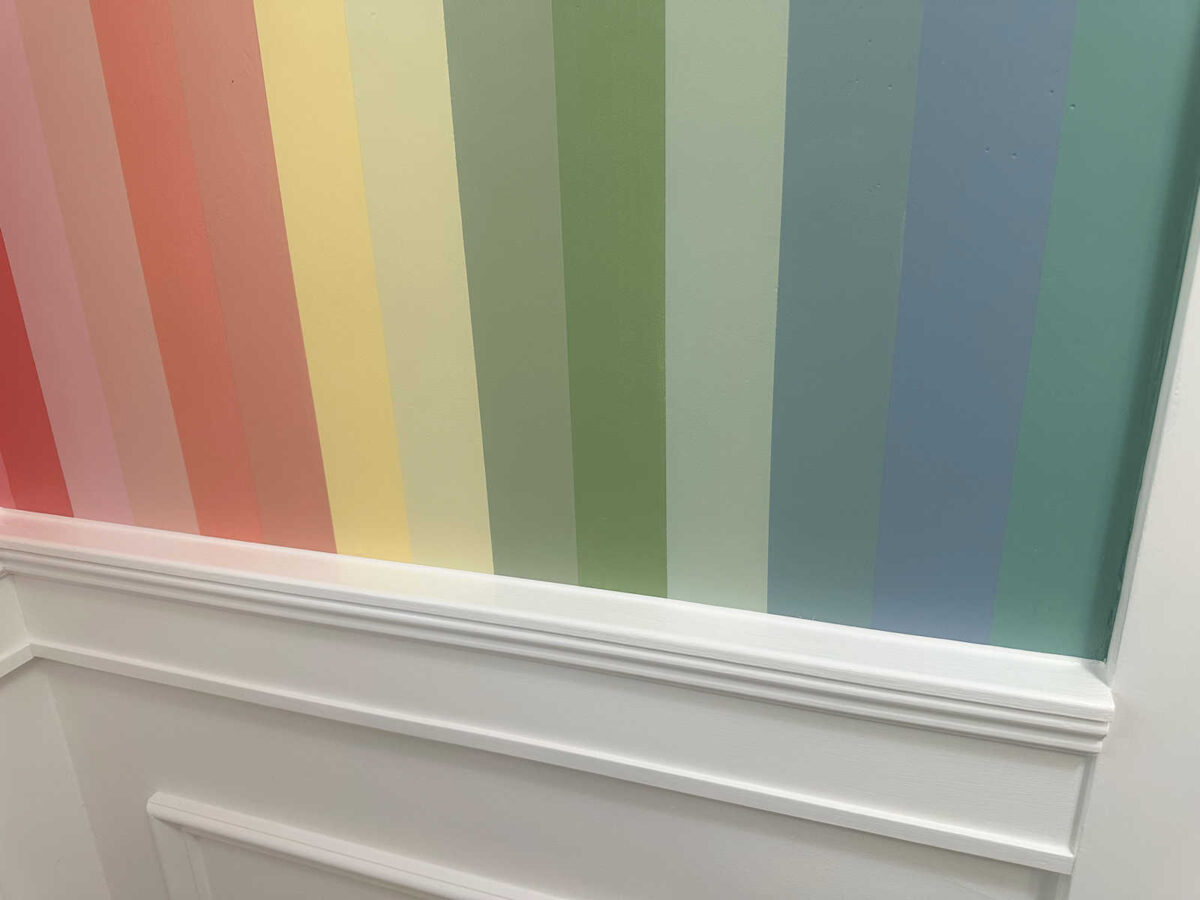
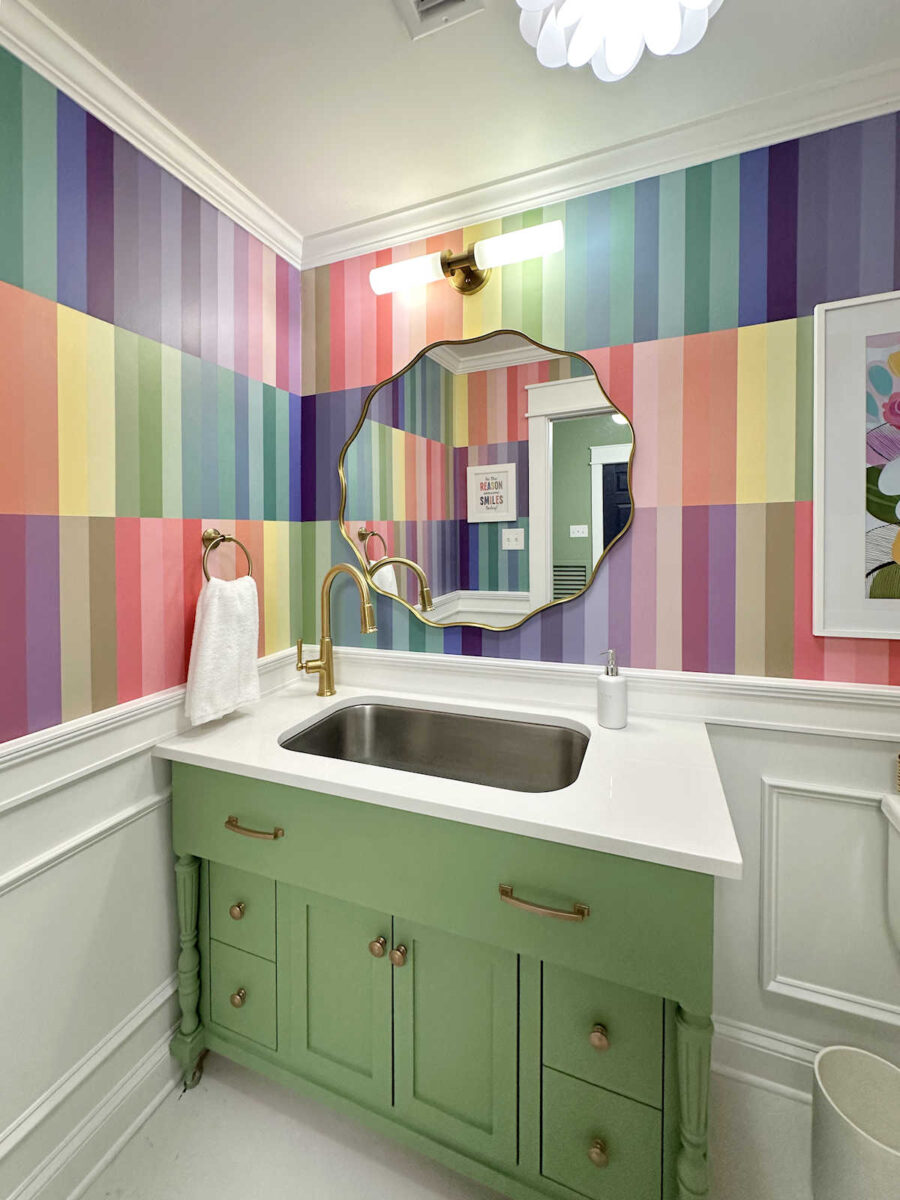
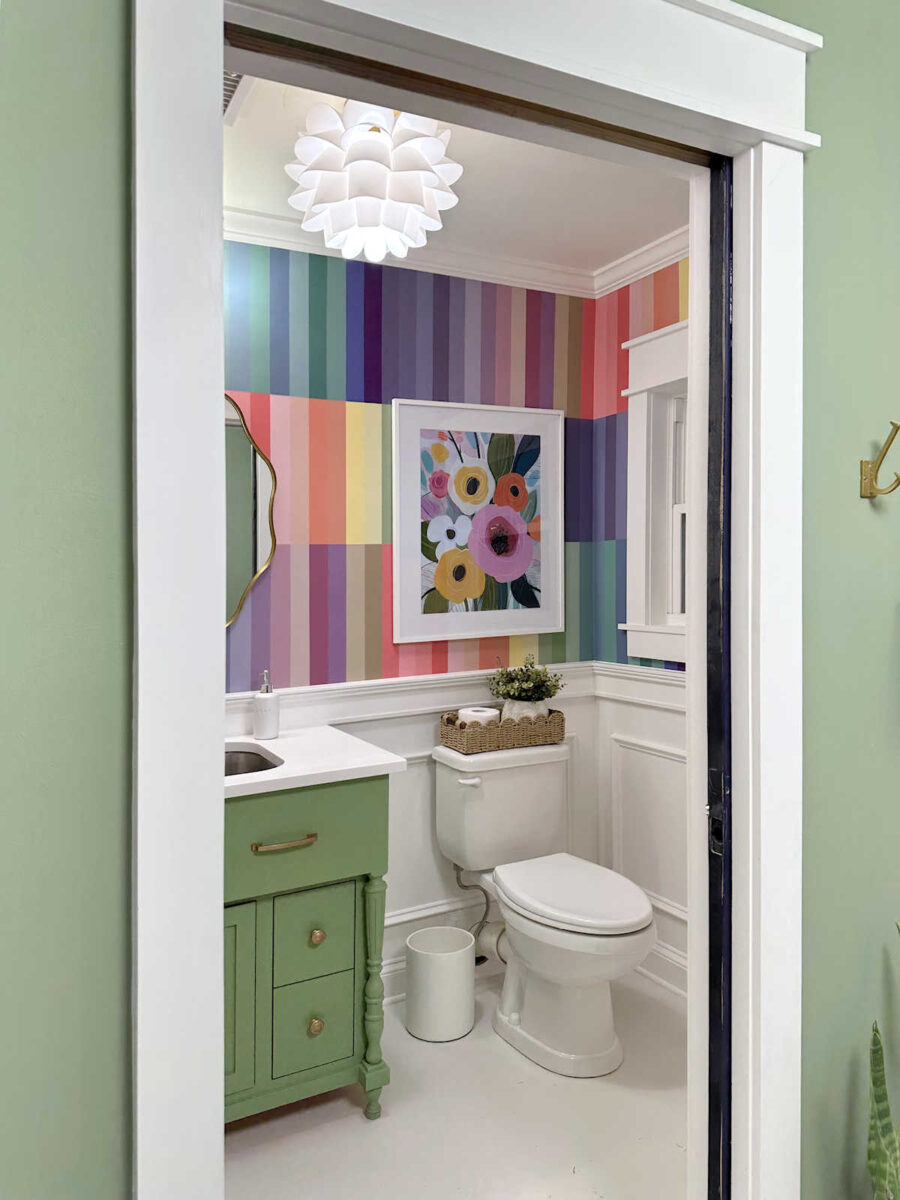
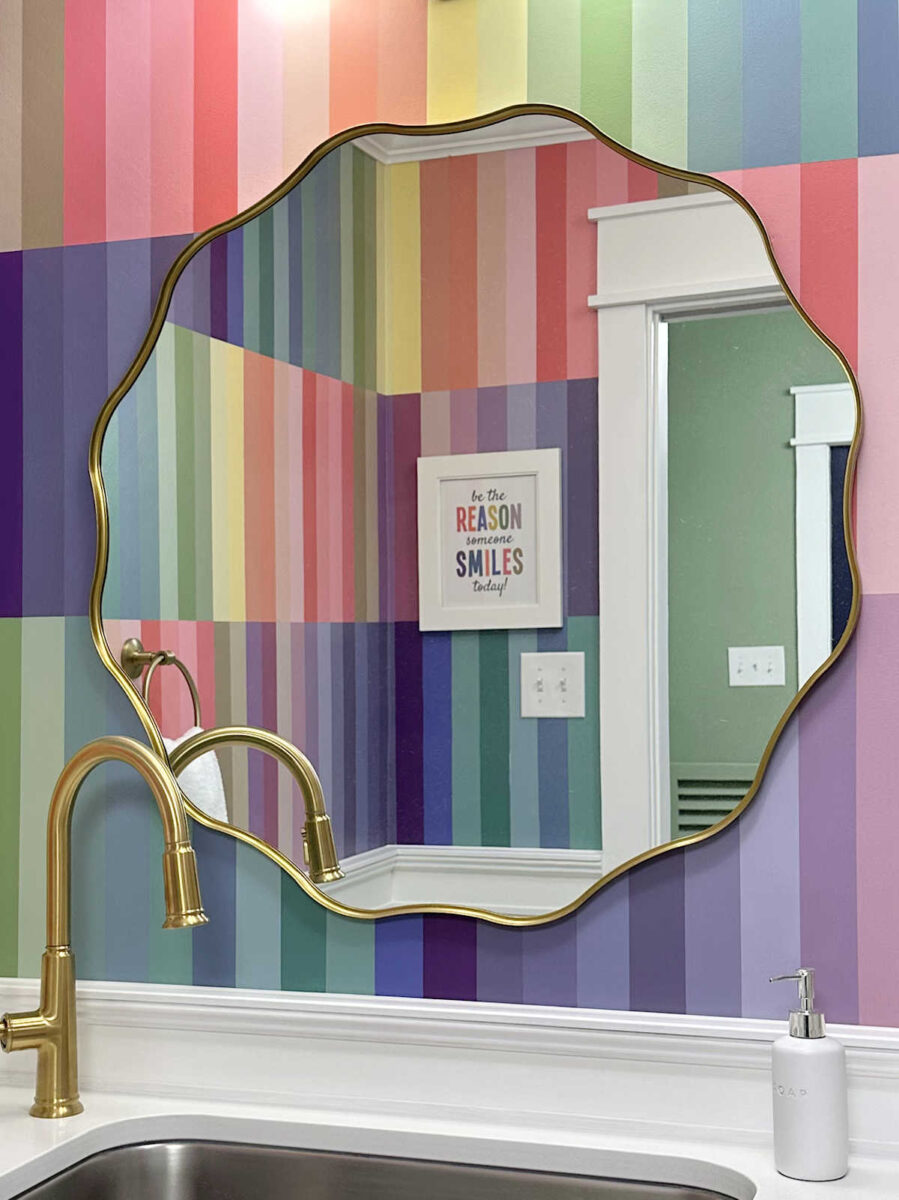
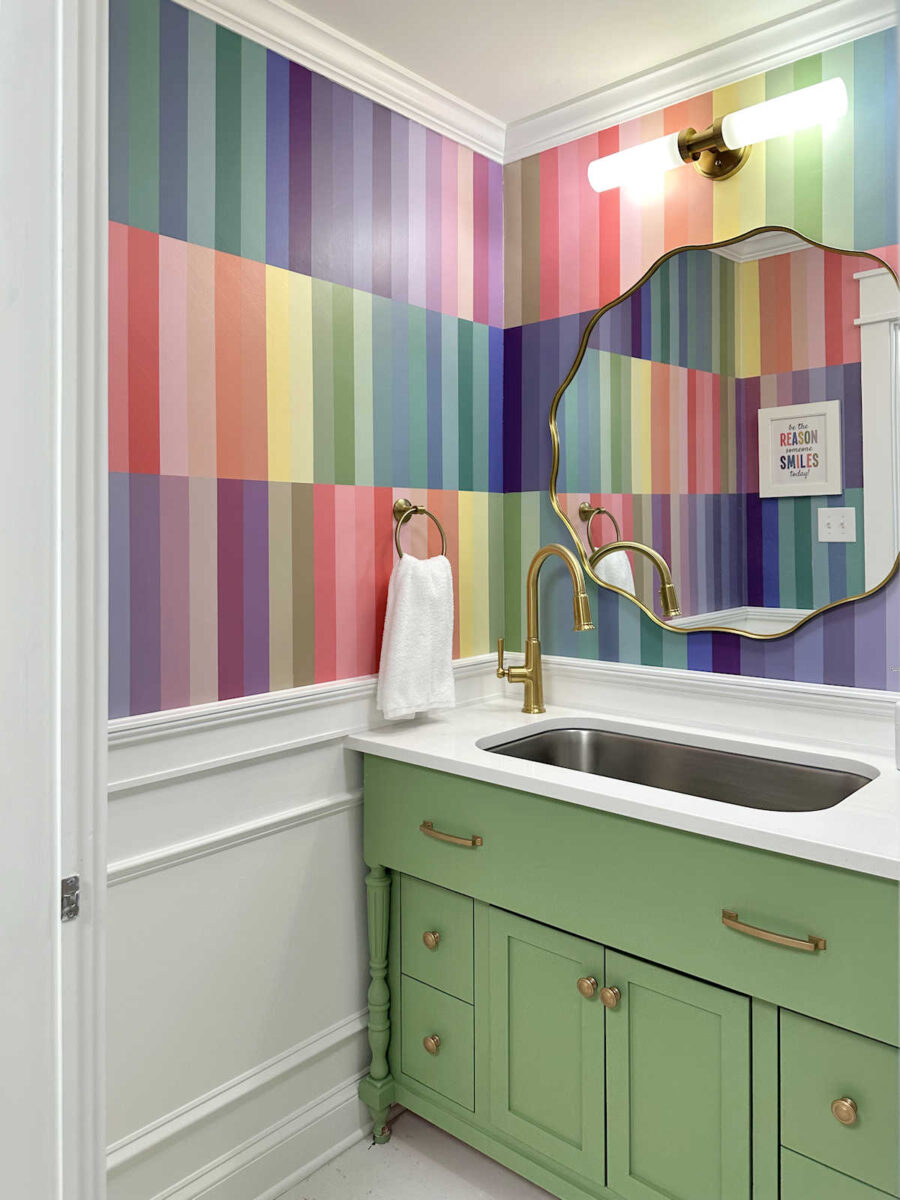
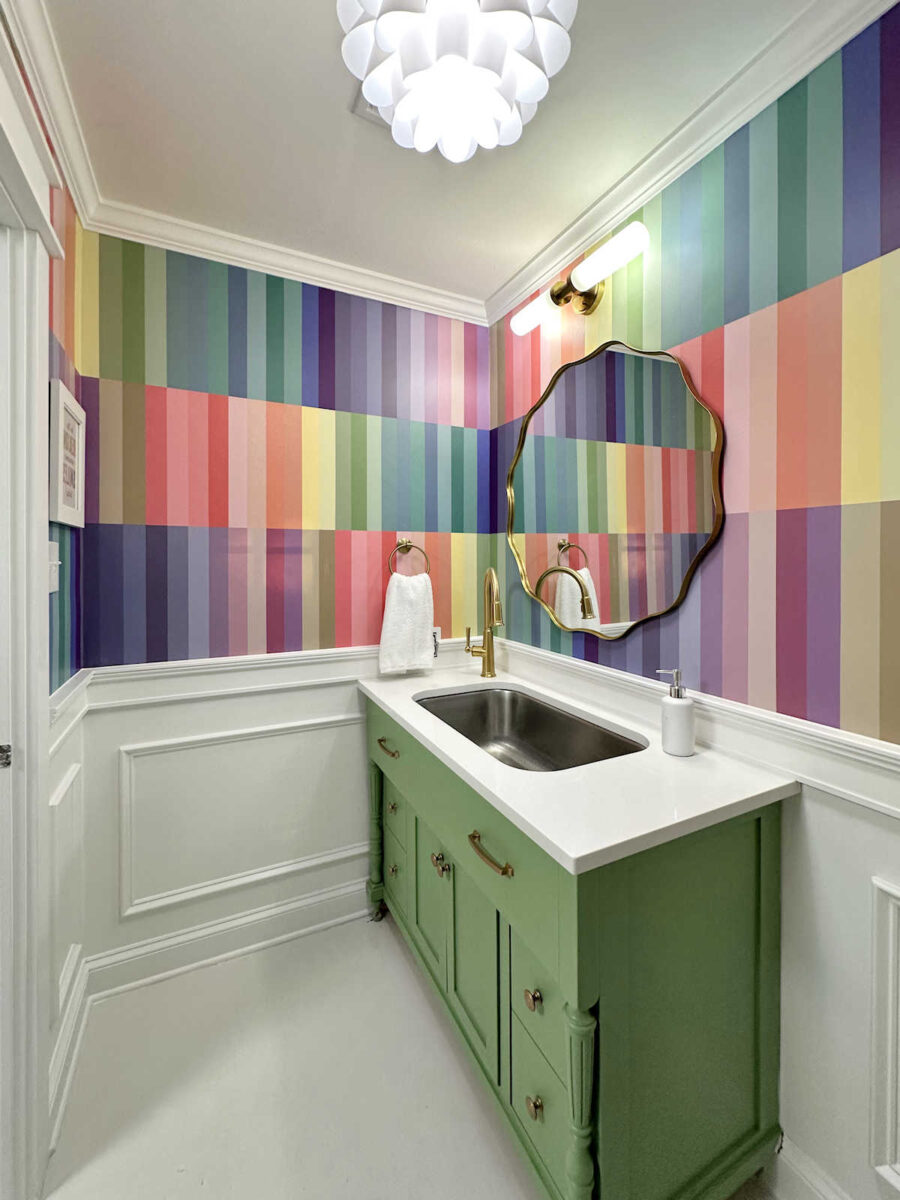
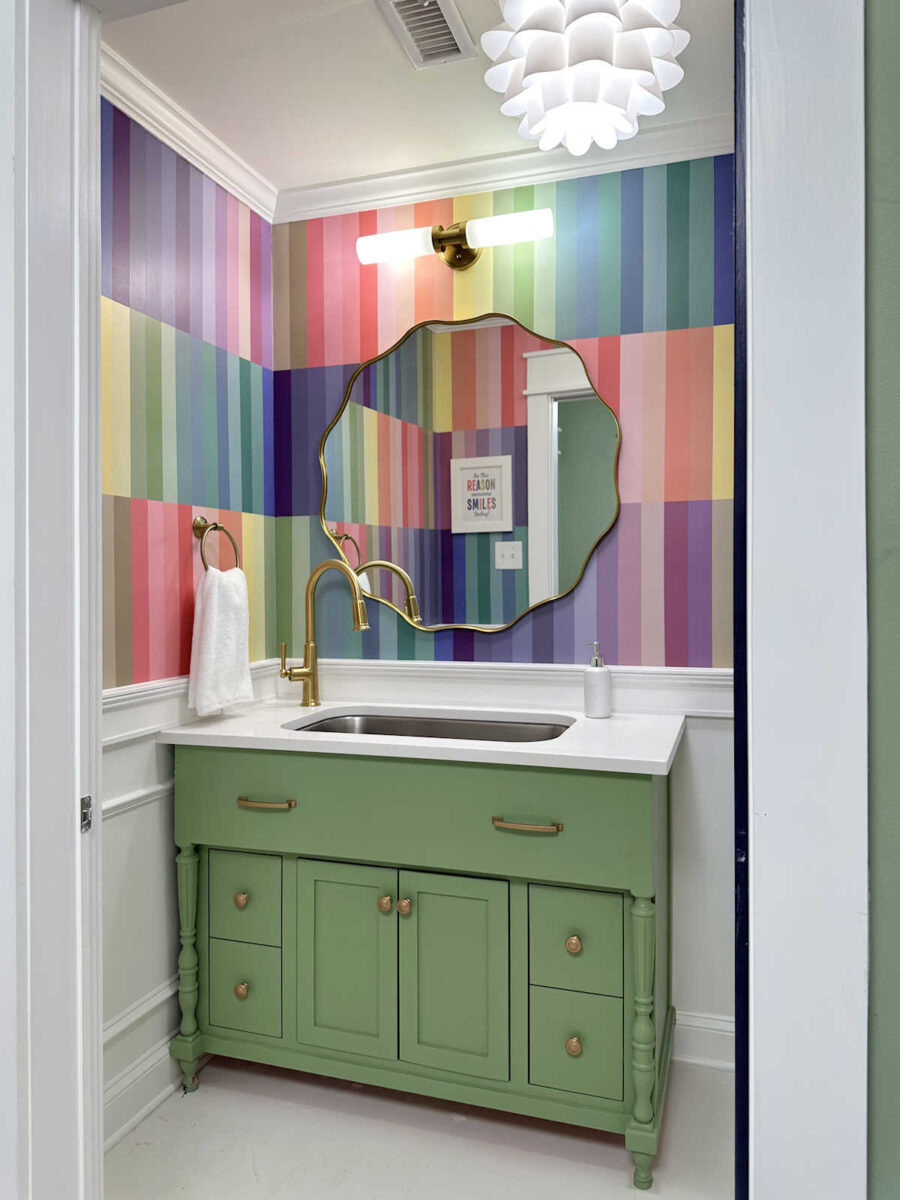
Right here is the way it turned out. The partitions are a hand painted design. My authentic thought of utilizing wallpaper didn’t work out, and in the long run, I’m truly grateful. It took so much longer to do the painted design, however I prefer it so significantly better!
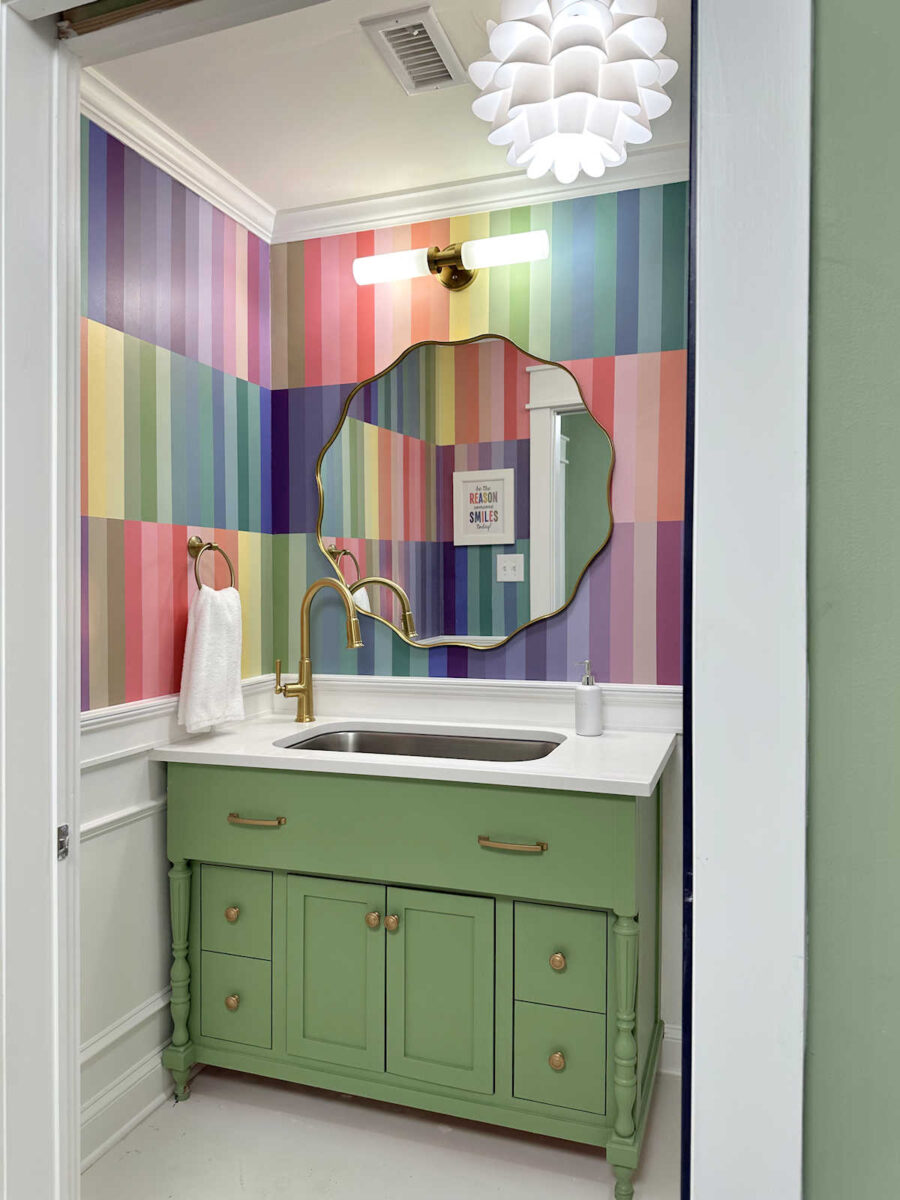
It’s a tiny toilet, nevertheless it actually packs a punch now.
Earlier than I present you extra, I need to present one element that I had to determine. I painted the partitions first, after which I painted the wainscoting. And after every part was painted, I wanted to caulk between the highest trim of the wainscoting and the striped wall. I made a decision it do it by inserting a paint stick on prime of the trim, after which inserting the painters tape proper alongside the highest of the paint stick. This gave me an area of about 1/8 inch above the highest trim of the wainscoting.
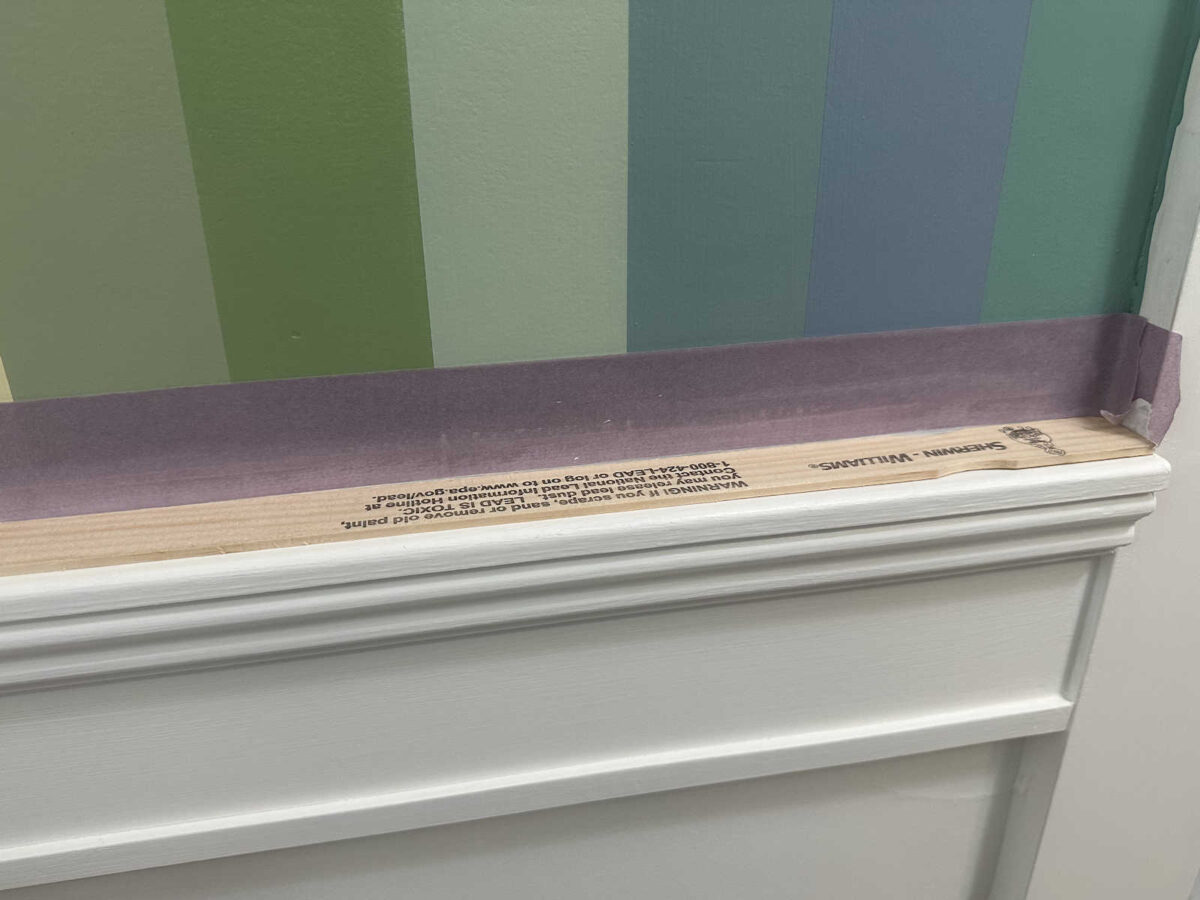
As soon as I had the tape round the entire room, I went again and caulked after which added two coats of paint.
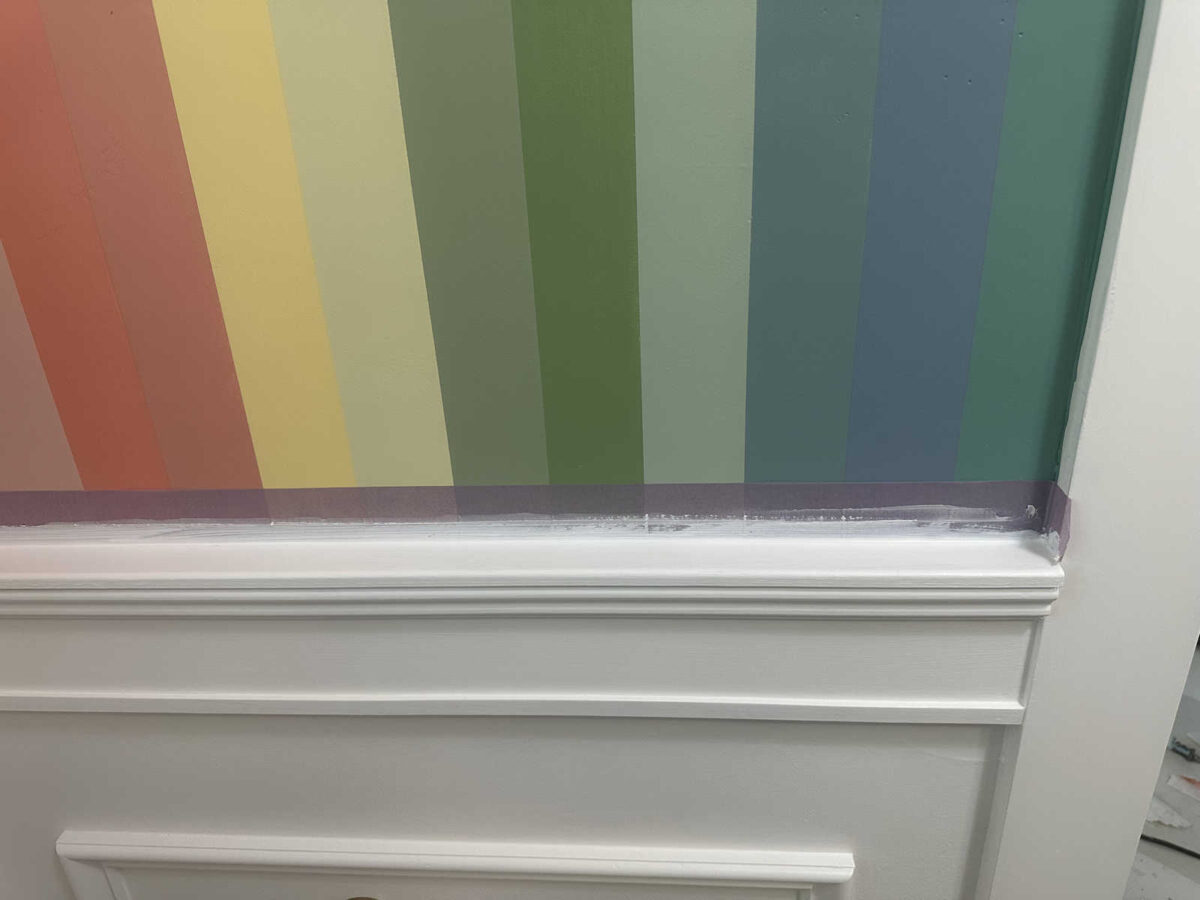
I eliminated the tape whereas the second coat of paint was nonetheless moist, and it left this completely straight and crisp caulk/paint line between the wainscoting and striped wall.
With that element out of the way in which, now let’s take a couple of minutes to journey means again in time and keep in mind the place all of this began out. This toilet is positioned in my studio, which was initially our storage. Sadly, I don’t have an image of what the storage appeared like within the very starting, however I do have this image of it after my father-in-law and I put up some drywall. The door on the left goes to what’s now our breakfast room (sitting room). The opening on the best went to a storage room in the back of our storage. The storage room was the entire width of the storage and about 7 ft deep.
And that is the aspect of the storage room that ultimately grew to become my studio toilet. It initially housed the large furnace, however we removed that the second yr we had been on this home.
So once we determined to show the storage into my studio, that again storage room within the storage was was a again entry (which now results in our carport) with the toilet on the left and a smaller storage room on the best. Within the image beneath, you’ll be able to see the realm that was walled off to turn out to be the toilet.

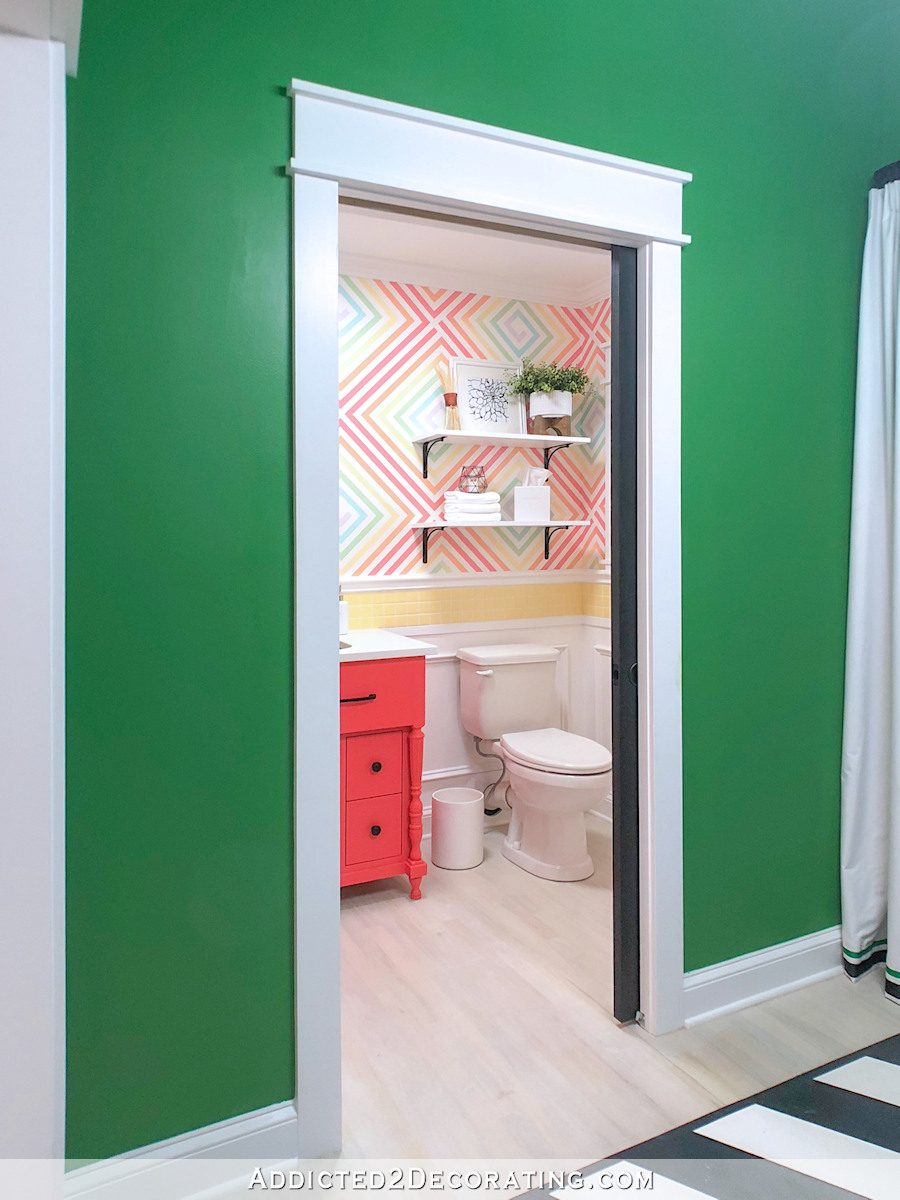
The primary time I completed this toilet, I did a loopy sq. spiral design on the partitions. I beloved it on the time, however after just a few years, I grew bored with it.
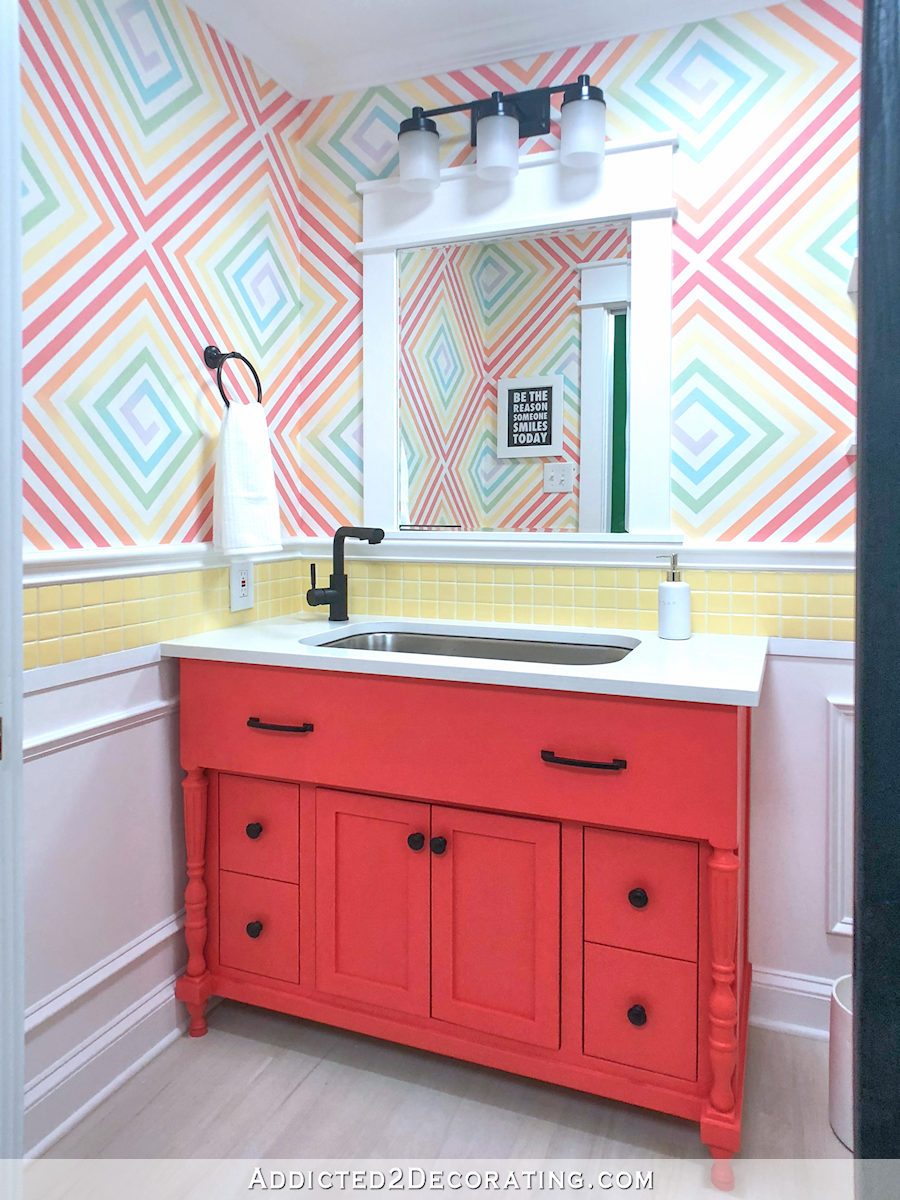
The brand new design is unquestionably extra me.
Right here’s a take a look at the opposite aspect of the toilet in its earlier colours…
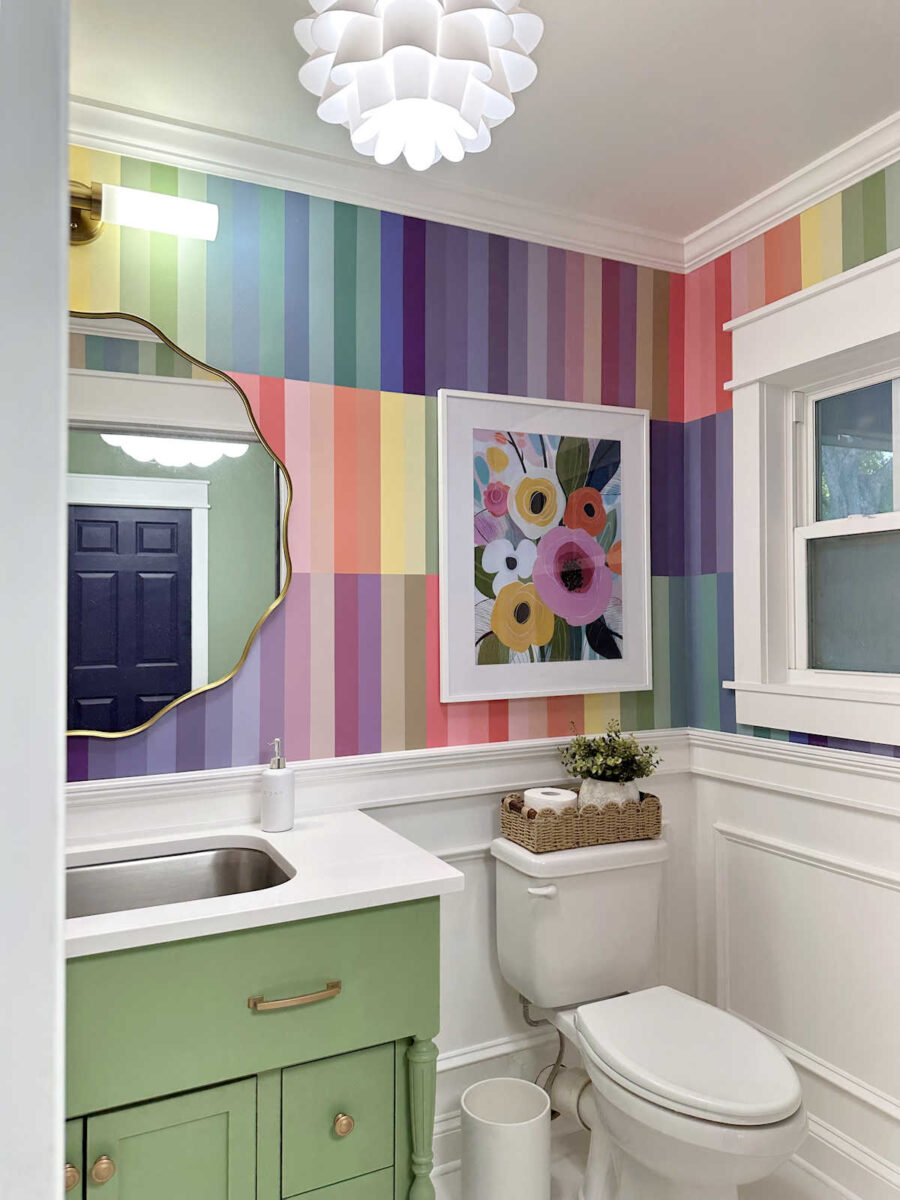
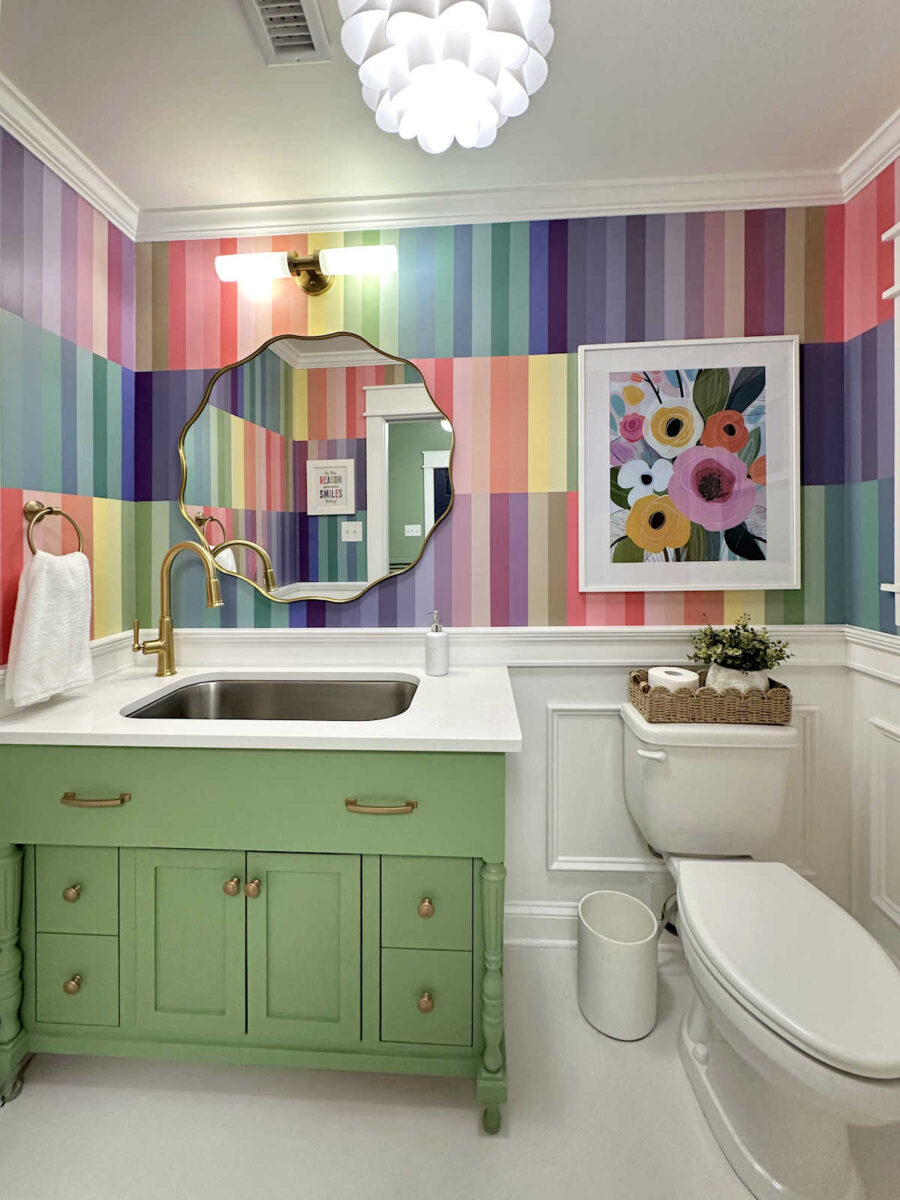
And right here it’s now with its superb 35-color partitions and new art work.
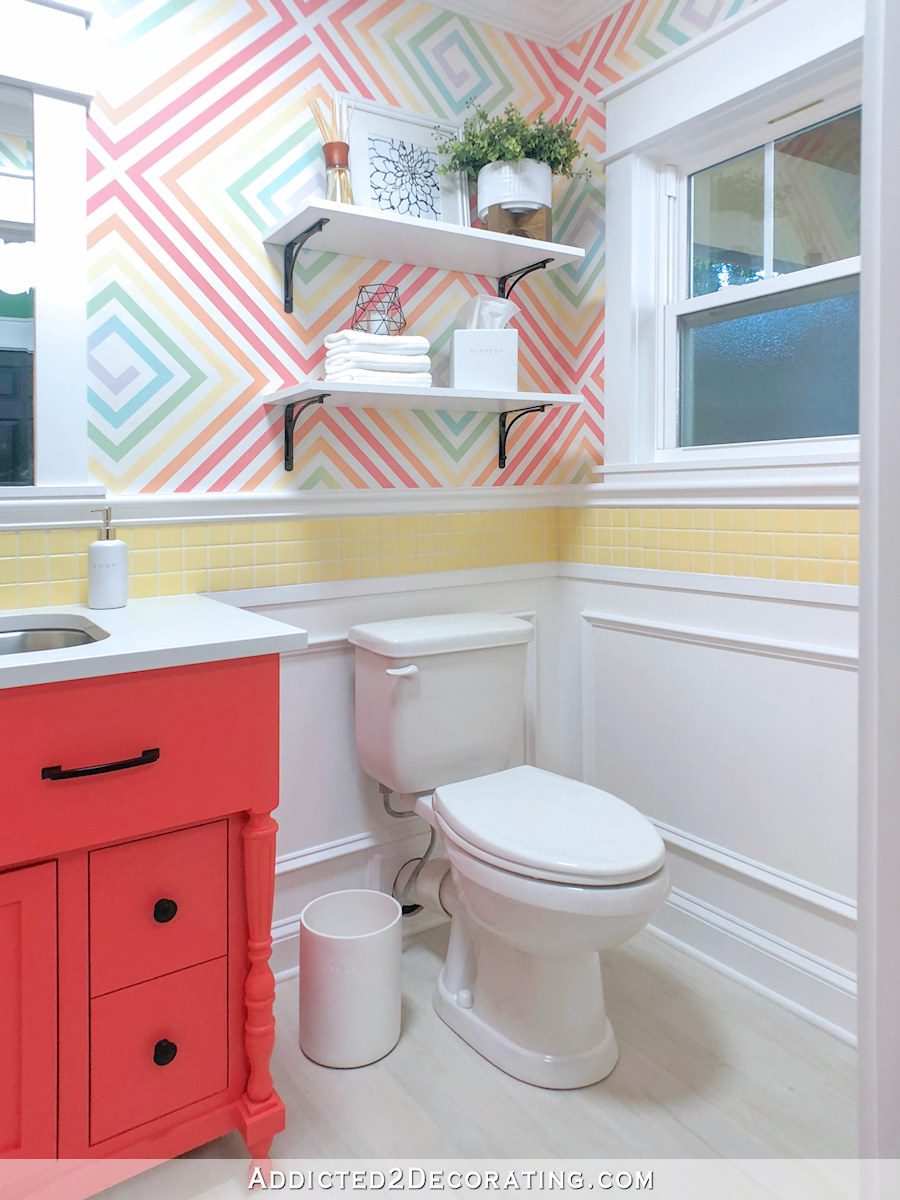
Right here’s a take a look at the earlier design from the again entry. It’s humorous to me how this earlier design used so much fewer colours, and but, it’s simply so jarring.
The brand new design has about 28 extra colours in it than the earlier design, and but, this appears to be like a lot extra pleasing to me. It’s daring and colourful, nevertheless it isn’t jarring (a minimum of to me).
And right here’s yet one more take a look at the earlier design with the pocket door displaying.
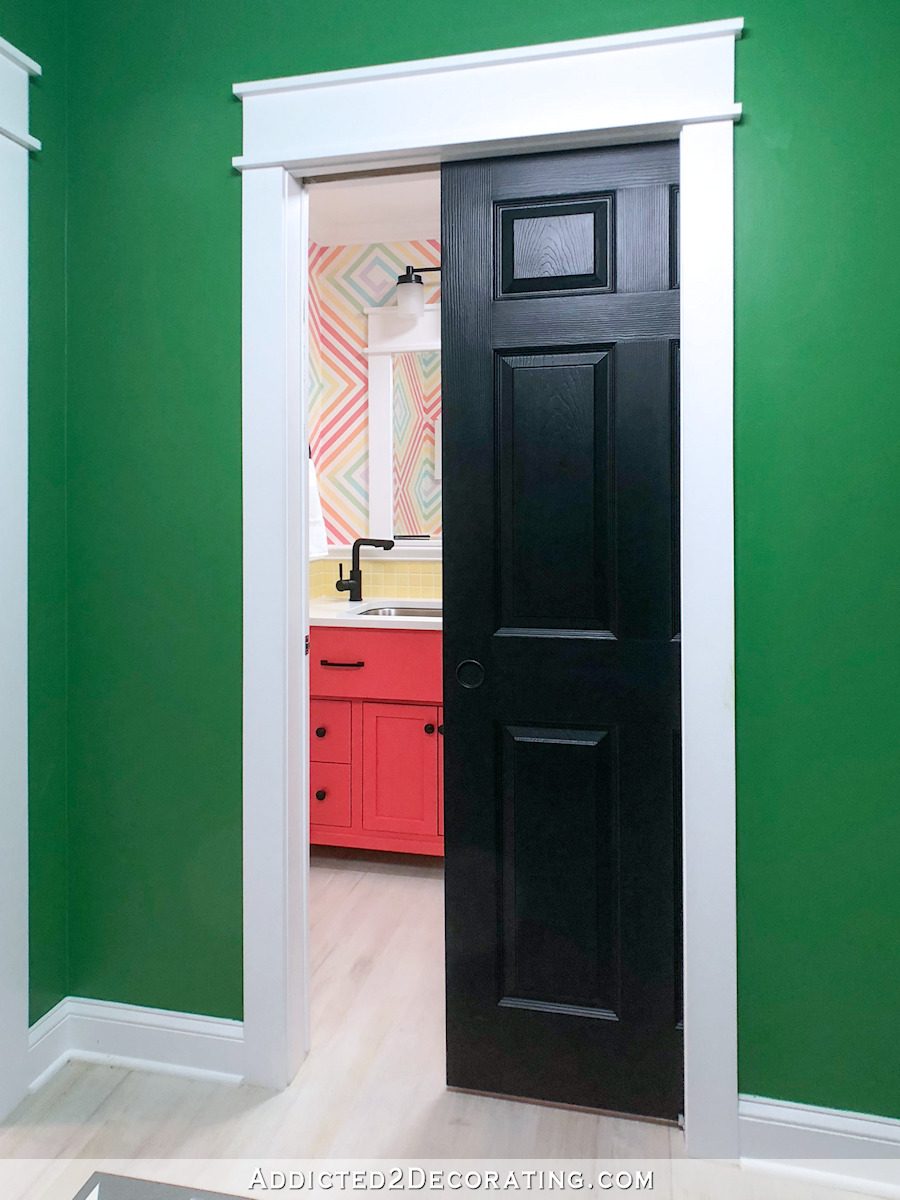
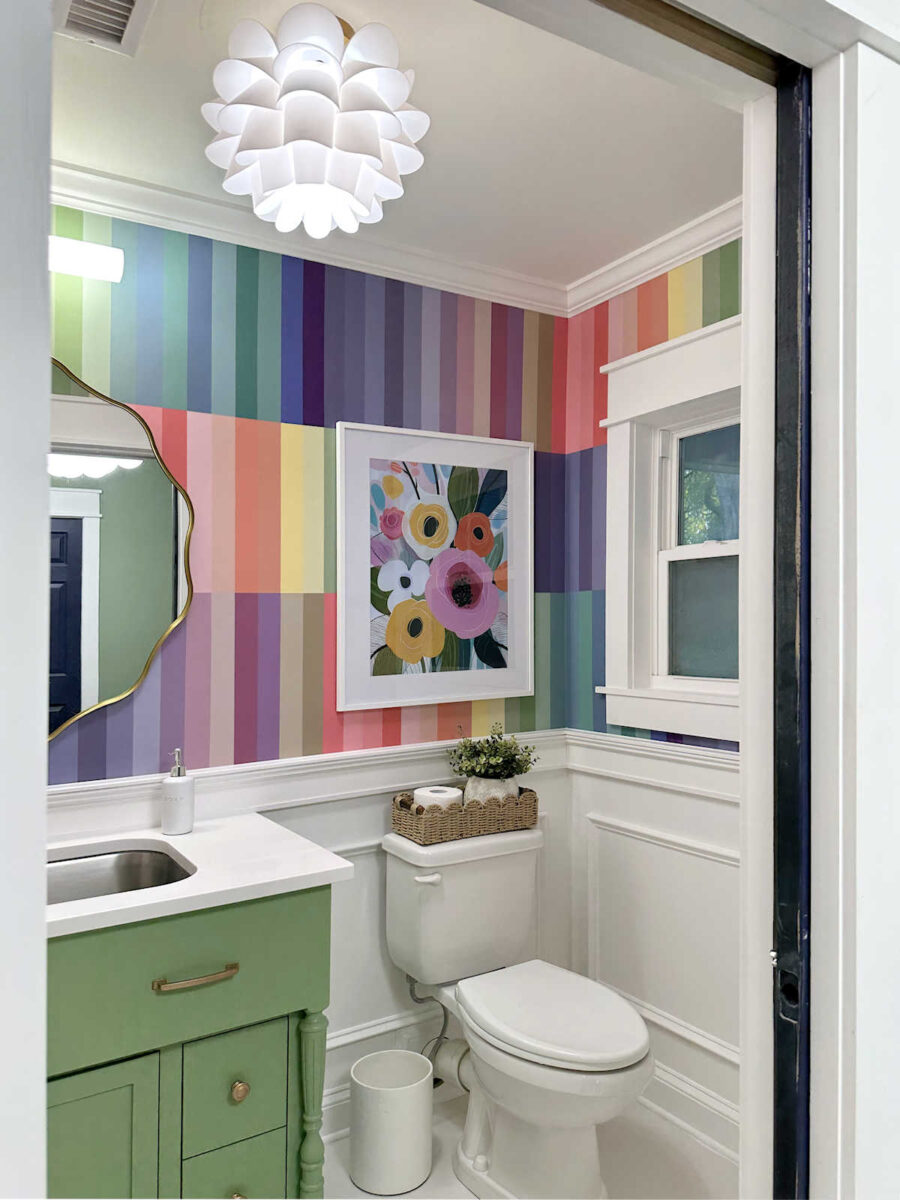
And right here’s a take a look at it now. The colour of the again entry partitions on this image isn’t fairly correct. I feel solar was coming in via the again doorways and washing out the colour, however the precise shade is extra of a real inexperienced with far much less yellow.

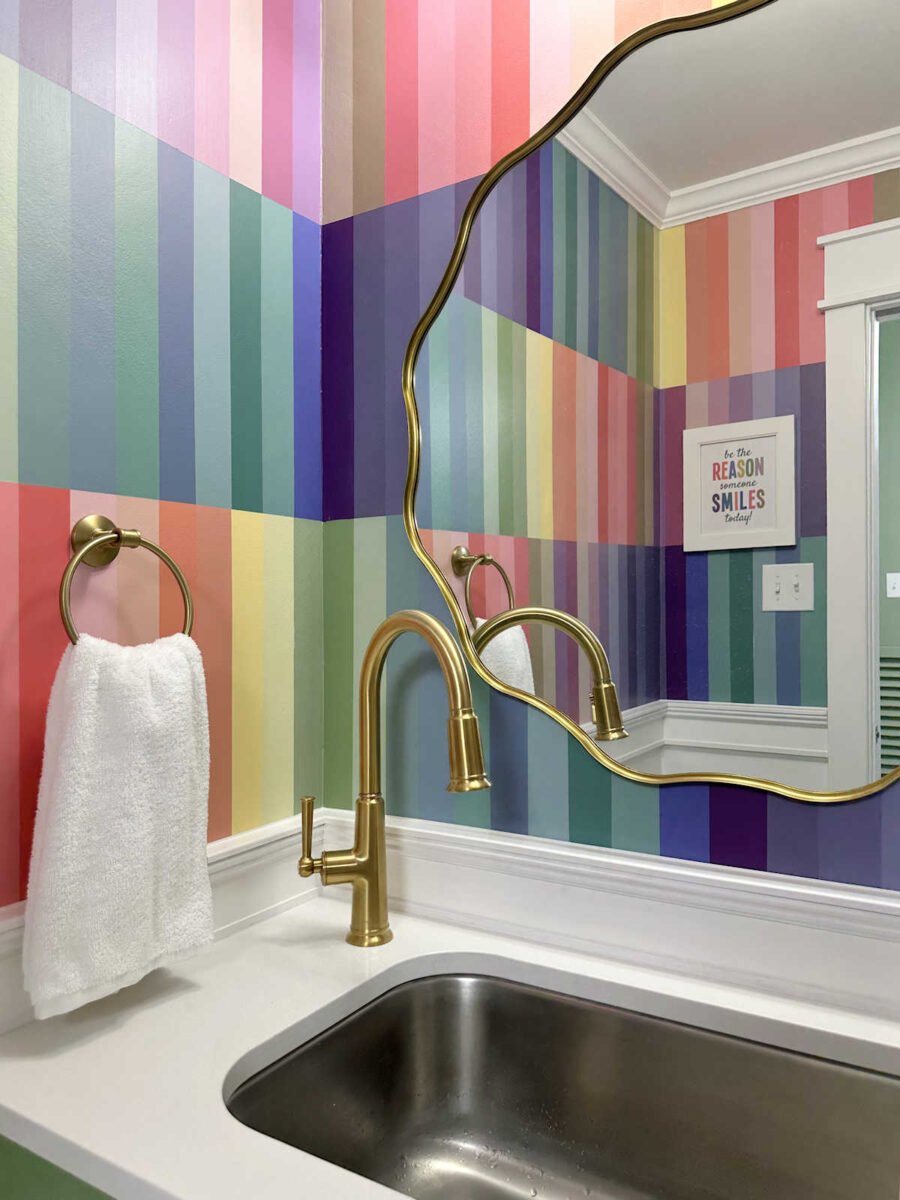
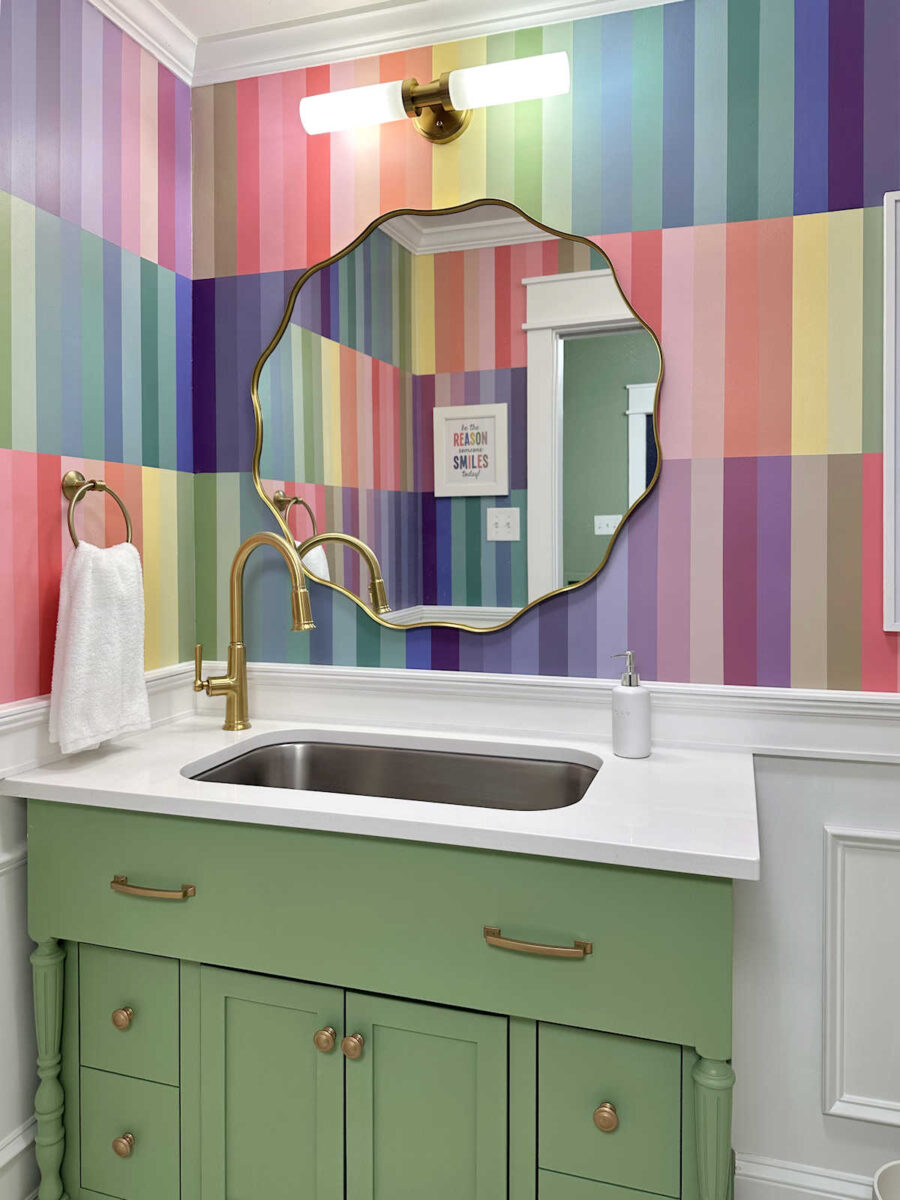
Within the earlier toilet, I had a print hanging on the wall reverse the mirror that stated, “Be the rationale somebody smiles in the present day.” However I printed it backwards in order that it was seen the proper means mirrored within the mirror. My mother beloved that, as did I, so she made me on to match the brand new colours of the toilet.
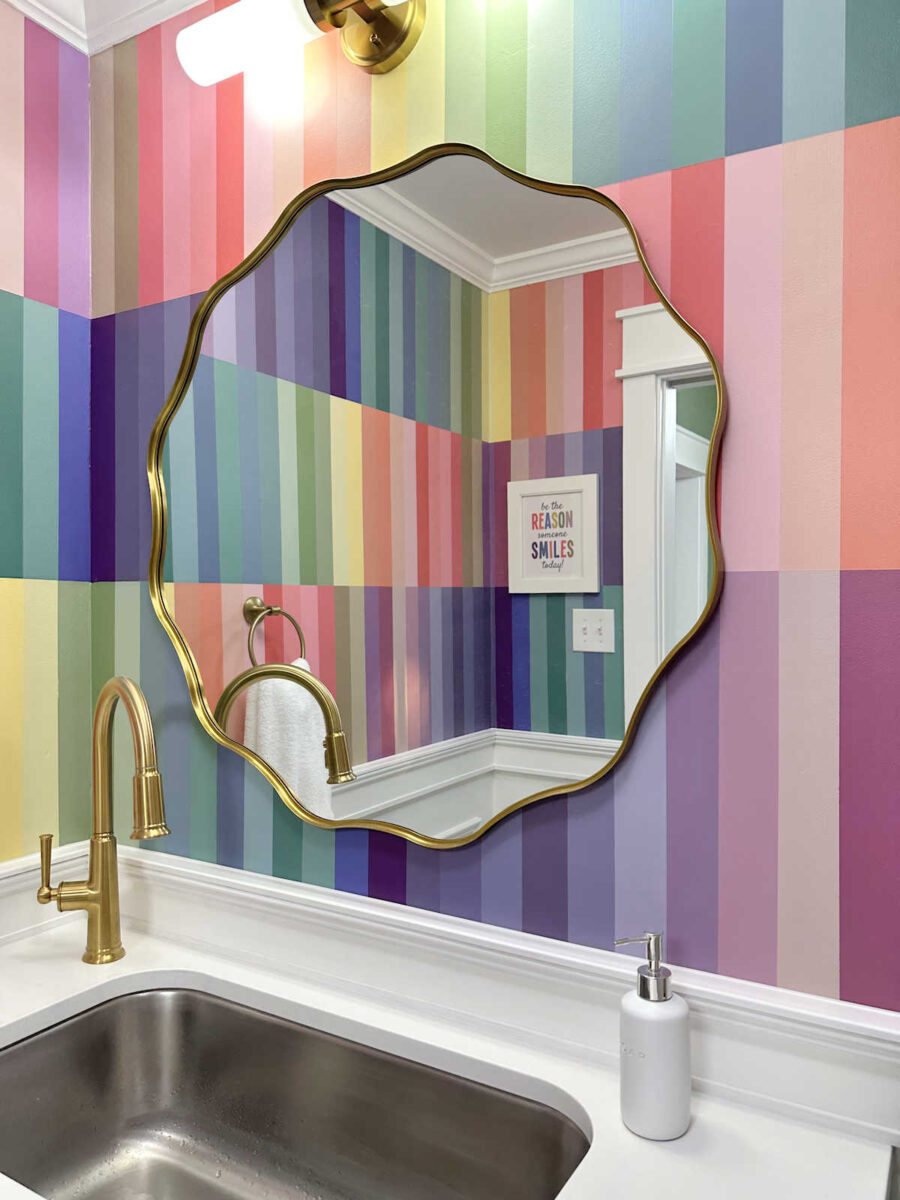
Due to the 2 completely different fonts on this one, it’s slightly more durable to see in photos. However when standing within the room, it’s fairly simple to see mirrored within the mirror.
I had thought-about portray the ceiling within the room a lightweight pink. Now that I see the room completed, I’m so glad I left the ceiling white. I really like how the white trim and ceiling above, and the white trim and waincoting beneath, actually body out the colourful partitions and allow them to be the star of the present.
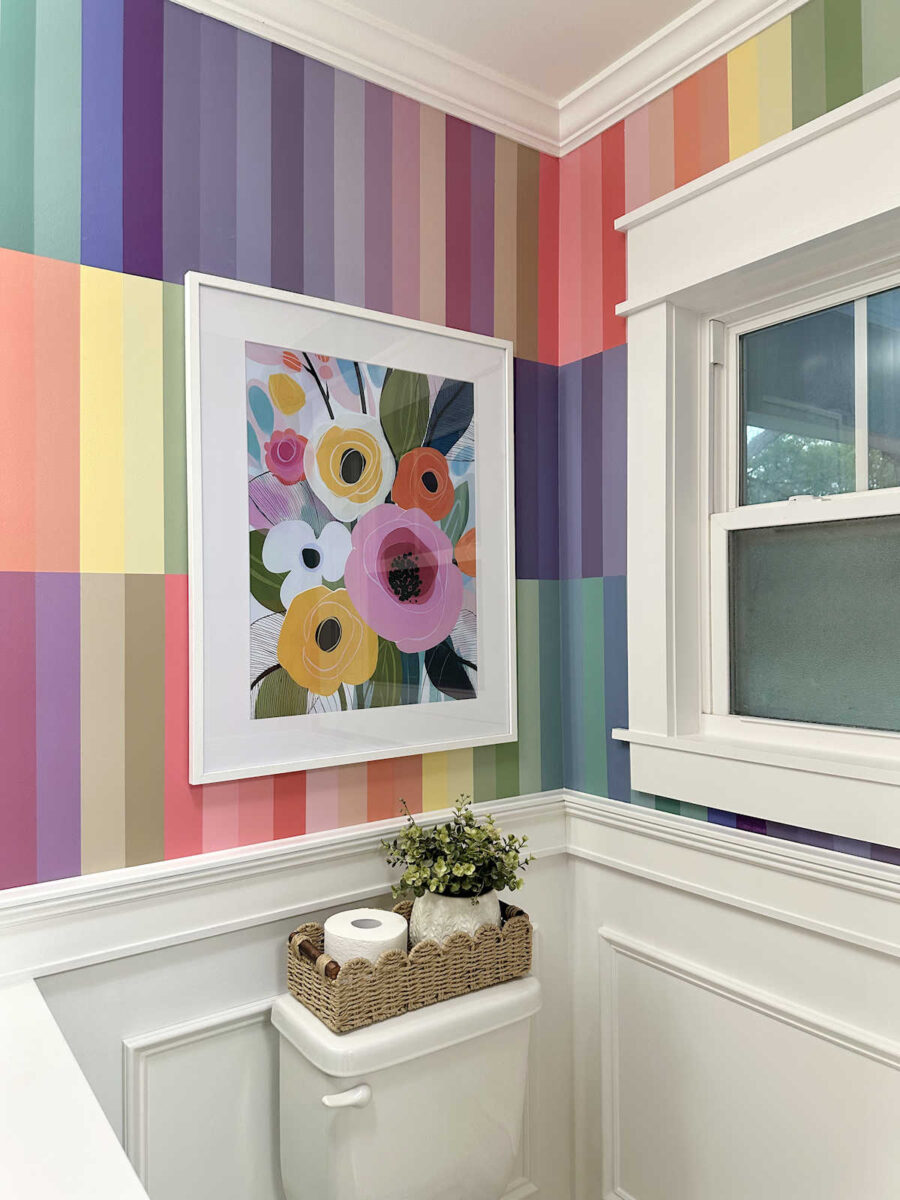
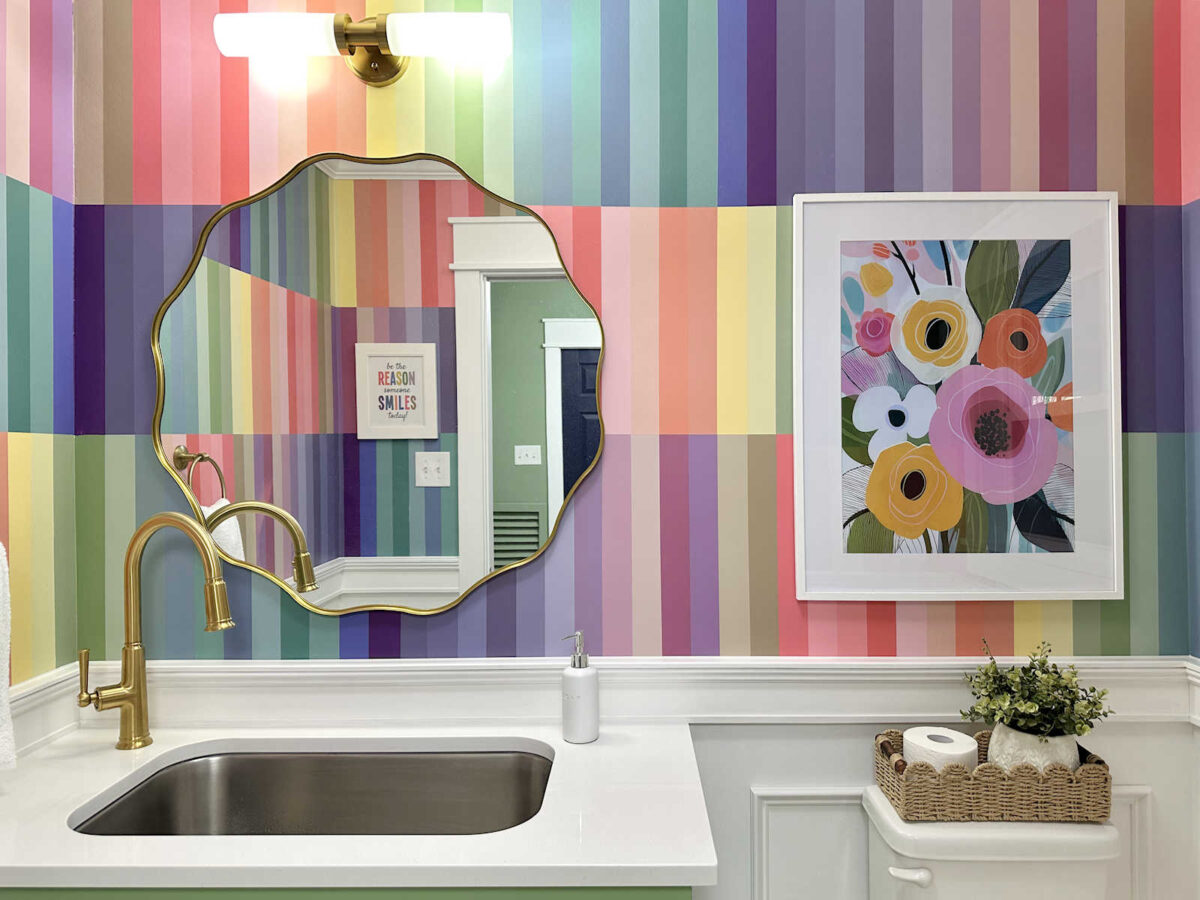
And whereas I really like, love, LOVE the partitions, I did really feel like I wanted one thing to interrupt up all the shade and stripes, so I discovered this colourful floral downloadable art work, had it printed, after which put it in a white body with a big white mat. I feel it’s a pleasant “break” within the wall design with out hiding an excessive amount of of the partitions.
I actually do suppose that is my favourite wall design I’ve ever completed. In reality, I find it irresistible a lot that I nearly want I had saved it for a a lot bigger room or a extra outstanding space in our dwelling. However then once more, I do know I find it irresistible an entire lot greater than Matt does. 😀 So I suppose it’s good that it’s tucked away in my studio toilet.
And in actuality, I can’t think about taking the time to do that wall design in a a lot bigger house. It took fairly some time to do the higher partitions on this tiny toilet. Had I attempted it in a bigger house, I feel I’d have misplaced curiosity midway via. 😀
As a result of I selected all of those shade based mostly off of the wallpaper I had initially designed for the room, and people colours got here from the floral wallpaper mural within the studio, the colours of this toilet coordinate completely with the remainder of the studio. Once I sit at my desk and take all of it in, all of it appears to be like so good collectively.
I’m going to have to attend and present you photos of the entire space at a later date. I used to be actually hoping that I may get my studio put again so as and get it sparkly clear in order that I may present you the entire space in the present day, however I ran out of time. And after doing a wall design with 35 colours, most of which I combined myself, plus all of my different instruments and provides strewn about, let’s simply say that my studio has a little bit of a post-tornado look to it. I’ll attempt to get all of it cleared away and cleaned up quickly in order that I can present you the broader view photos quickly.
If any of you occur to be new right here, I additionally needed to elucidate why I’ve a kitchen sink and tap on this tiny toilet. Once more, that is my studio toilet, and I do all types of initiatives in my studio. As we had been turning this space of the room into a toilet, my authentic thought was to place a utility sink in right here. I needed a deep sink and a big faucet as a result of I by no means know what I may have a sink for with all the varied initiatives I do. However in the long run, as an alternative of a utility sink, I made a decision to construct my very own sink base after which use a kitchen sink and a kitchen faucet as an alternative. I assumed that might be a lot prettier and provides me extra flexibility than a utility sink.
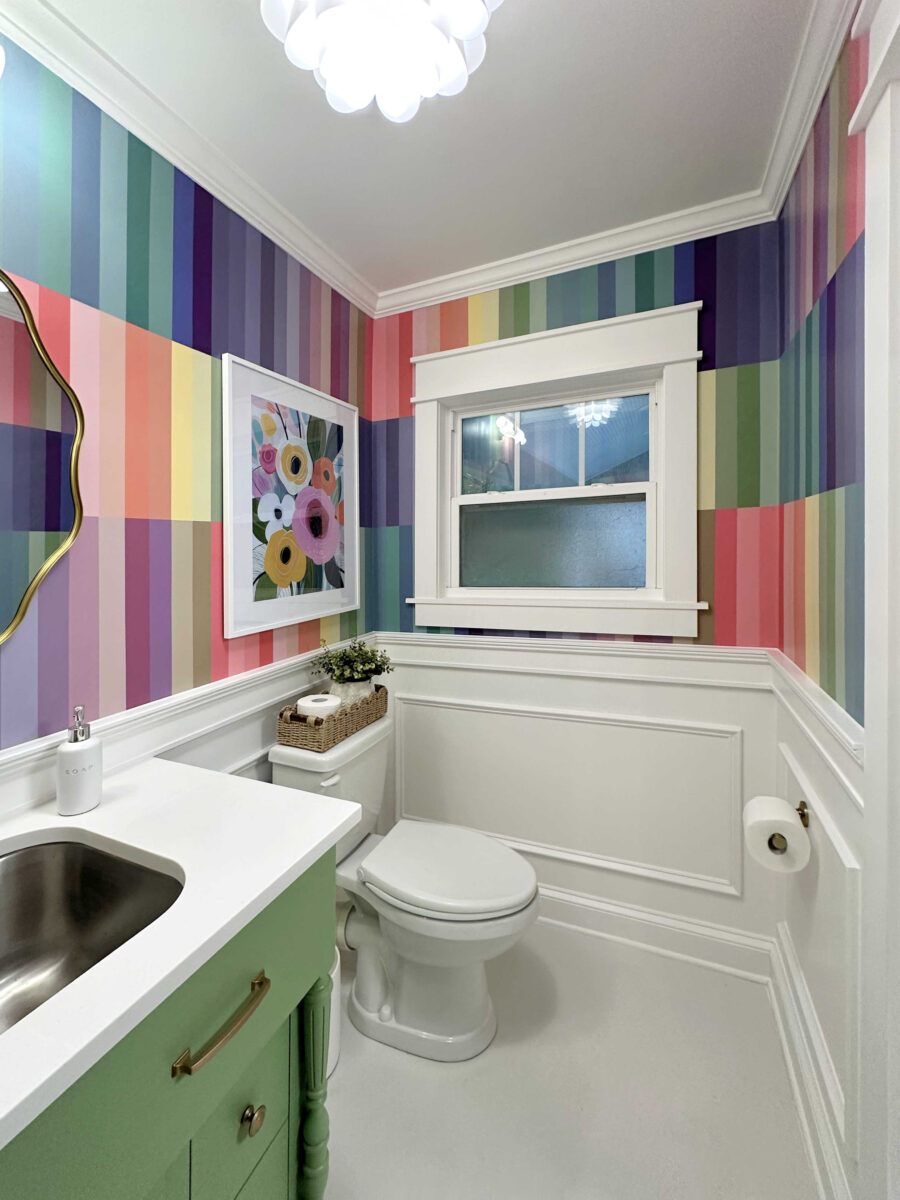
Certainly one of my favourite additions to this room is that this cute little ceiling mild that appears like a flower.
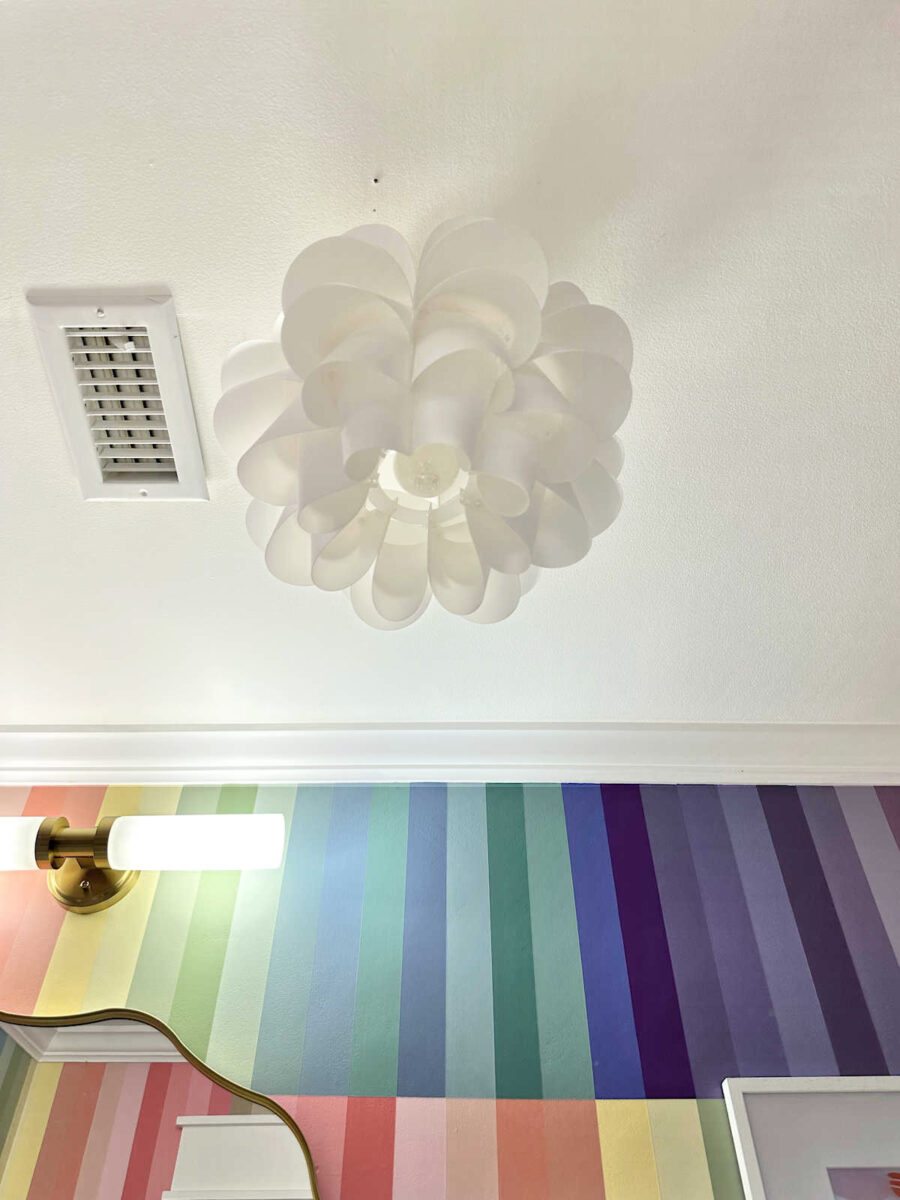
It’s made from a tough plastic, and it’s sturdy sufficient to be cleaned with a moist fabric or a Swiffer duster.

However I’m very glad that I swapped out that earlier wall mild for this extra streamlined design that doesn’t compete with the lovable floral ceiling mild. I feel this one is ideal for the toilet. However I missed the truth that this mild requires a particular form of bulb. I received the sunshine put in, after which realized that there’s no means common lightbulbs will match into these shades. So I needed to order new elongated bulbs to suit.
And in hindsight, I form of want that I had gone with a set of 4 prints to go over the bathroom as an alternative of 1 giant print. Once I ordered the body and the print, it didn’t even daybreak on me that I’d have one giant print subsequent to a one giant mirror. I feel a collection of 4 prints might have appeared slightly higher. My mother urged that I may truly lower this print into 4 items and body them individually to realize that look. I really like that concept, and I may very well try this sooner or later. However for now, I made a decision to simply persist with the one giant print.
I needed to get the entire wall, the flower ceiling mild, and the vainness in a single image, so I set my digicam to the broad angle setting and took this image. I laughed so onerous at how that broad angle setting distorted the form of the bathroom. 😀 However it’s the one means I may get every part into one image.
In order that’s it! This undertaking is wrapped up, and my complete studio space is now utterly completed. I’ll present y’all photos of the entire space as quickly as I can get the studio put again collectively and sparkly clear.
Sources:
Flower ceiling mild: Amazon (affiliate hyperlink)Floral printable art work: Etsy (affiliate hyperlink)Mirror: Amazon (affiliate hyperlink)Wall Mild: Amazon (affiliate hyperlink)Elongated mild bulbs: Amazon (affiliate hyperlink)White 24″ x 30″ body with mat: Amazon (affiliate hyperlink)Faucet: House DepotScalloped basket: Amazon (affiliate hyperlink)
Paint Colours:
Self-importance: Sherwin Williams BroccoflowerWainscoting: Behr Polar BearFloor: Benjamin Moore Traditional Grey (shade matched in Behr Porch & Patio Paint)
DIY Tasks:
DIY vainness for kitchens sinkStriped wall design
Extra About My Studio Toilet

Addicted 2 Adorning is the place I share my DIY and adorning journey as I rework and enhance the 1948 fixer higher that my husband, Matt, and I purchased in 2013. Matt has M.S. and is unable to do bodily work, so I do the vast majority of the work on the home on my own. You’ll be able to study extra about me right here.

")


")


")

