

My workshop pergola is completed, and it turned out identical to I had envisioned it. I find it irresistible when that occurs! I couldn’t be happier with this undertaking. It added that a lot wanted depth and dimension to the in any other case very flat entrance of the workshop, and I believe it’s the right of completion to the entrance of the constructing.
Right here’s a take a look at the way it turned out.
You’ll be able to see the entire course of, begin to end, right here…
After I left off in Half 1, I had completed the brackets and put in them. So then subsequent step was to construct and fasten the rafters. For my 31-inch pergola, I made three rafters. These are the elements that typically have an ornamental design minimize within the ends, so to make that embellish finish, I used a sanding disc as a sample. I used a chunk of painters tape to mark the place I needed the circle to line up on the sting of the board.

After which I lined that up on the finish of the board and traced round it.

Then I moved it to the opposite facet of the board, made it contact the primary circle, and traced once more.

As soon as I had erased the additional strains, that is the design that was left.

And as soon as I minimize that out utilizing my miter noticed, that is the ultimate design.

These boards have been very tough, in order that they wanted a substantial amount of sanding to get them easy and fairly.

As soon as they have been sanded, I used two coats of Zinsser B-I-N shellac-based primer, adopted by two coats of exterior paint from Sherwin Williams.

For the again rafter, I needed so as to add one thing to maintain rainwater from coming off of the roof and being funneled instantly onto the entrance porch. So I used some PVC boards that I had leftover from earlier tasks, and I minimize three strips.

After which I glued these collectively in a stack utilizing PVC glue and 2-inch nails.

And I connected these to the bottom of the again rafter in order that it shaped an angle, peaked within the heart and sloping down on the perimeters.

With that connected, the bottom appeared like this.

Right here’s one other view of it from the facet.

After it was connected, I caulked the place these PVC boards met the board. I did this earlier than portray the boards. Additionally, this solely reveals two items of the PVC strips, however I did use three strips to get the best depth.

Earlier than attaching that again rafter, I added a thick bead of silicone caulk alongside the again fringe of that PVC strip, and pushed it up towards the fascia board actually tight to kind a seal.
Subsequent, I put in the entrance rafter, after which I might mark and measure the middle between these two to put in the middle rafter.

With all three rafters in place, it really began to appear to be a pergola!


Right here’s a take a look at how that again PVC extension meets the fascia board. You’ll be able to see the height within the heart and the slope in direction of the perimeters.


The ultimate piece of the pergola was the purlins for the very high. I used 2″x2″ lumber for these, and I needed to chop a embellish angle on the ends. So I minimize the primary one, and marked the tip of that board on my miter noticed to make use of as a information for the remaining.

Utilizing that mark as a information, I might rapidly minimize the opposite 15 purlins with that very same angle.

Right here’s what the ends appeared like with that angle minimize.

I used a 3-inch curler to prime and paint these utilizing the identical merchandise I had used on the opposite items.

Earlier than putting in these, I went forward and began the screws on the again facet of every purlin.

I additionally minimize a 3.75″ spacer in order that I wouldn’t must measure and mark placement for every purlin whereas I used to be up on the scaffolding, and I additionally marked the middle of that spacer in order that I might use it to seek out the position of the primary purlins (since I used to be utilizing a fair quantity and wouldn’t have a purlin proper within the heart of the rafters).

Having these screws began within the again facet of the purlins saved me a lot bother as a result of this was the toughest a part of the entire undertaking. Since I’m so brief, I couldn’t attain over the rafters to screw in these again screws. As a substitute, I needed to attain up and thru the rafters to get to these again screws.

And as soon as I had that first one on and began working my means in direction of the left facet of the pergola, I used to be just about working blind. I couldn’t see what I used to be doing in any respect, so I simply needed to really feel for proper placement. There’s no means I might have accomplished this had I not minimize a spacer and began these screws. I wouldn’t have been in a position to see to mark and measure every one with a tape measure, and I wouldn’t have been in a position to maintain a screw in place whereas additionally holding the purlin in the best place and screwing it on.

As soon as I received the again screws on, I might get up on my scaffolding and attain excessive to get to the center and entrance screws.

This is able to have been a lot simpler had I constructed the pergola first, after which constructed the steps. However I made it work. However because it was, I needed to put my scaffolding upon the highest step, so there wasn’t an entire lot of room for shifting the scaffolding into the right place. I had no choice however to be caught in that one place. And sure, this was very protected. These wheels are locked and turned perpendicular to the constructing, and the brackets held the scaffolding very nonetheless and durable.

I lastly managed to get the entire purlins connected, and with that, the pergola was completed!
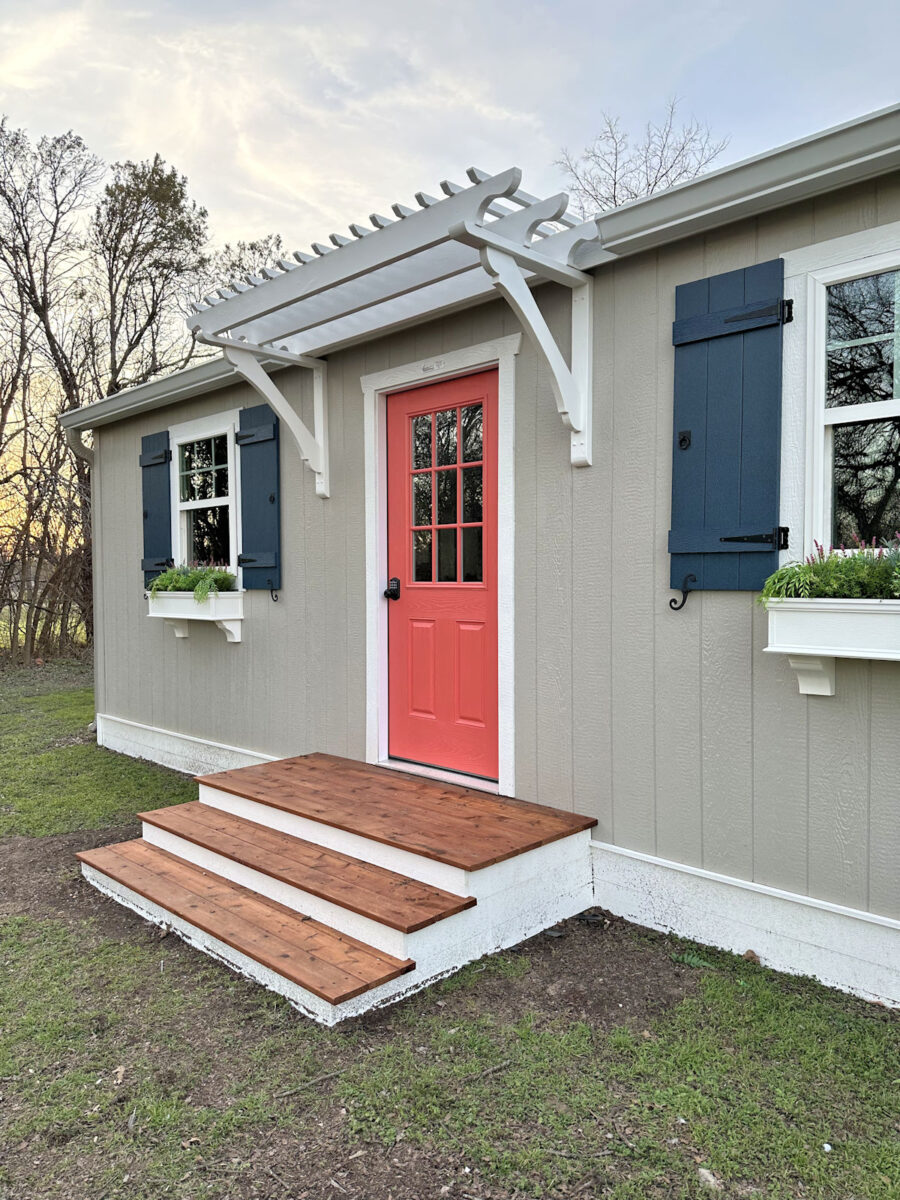
It’s not typically {that a} completed product appears to be like identical to a mock up, however this one does! And I’m simply thrilled with the way it turned out.

Since this constructing is mainly an enormous shed constructed by a shed firm, I didn’t actually have any choices for including curiosity to the entrance of the constructing. However I believe that is the right contact.

When it rains, the steps will nonetheless get rained on, however that wasn’t a priority that I had. My solely concern was that I didn’t need rain pouring instantly off of the roof onto the entrance steps. However with the addition of that PVC extension, that’s not a problem.

And sure, it really works! We’ve had a downpour since I connected that again rafter, and I went out within the rain particularly to see if it was doing its job. I’m more than happy to say that it labored simply as deliberate.
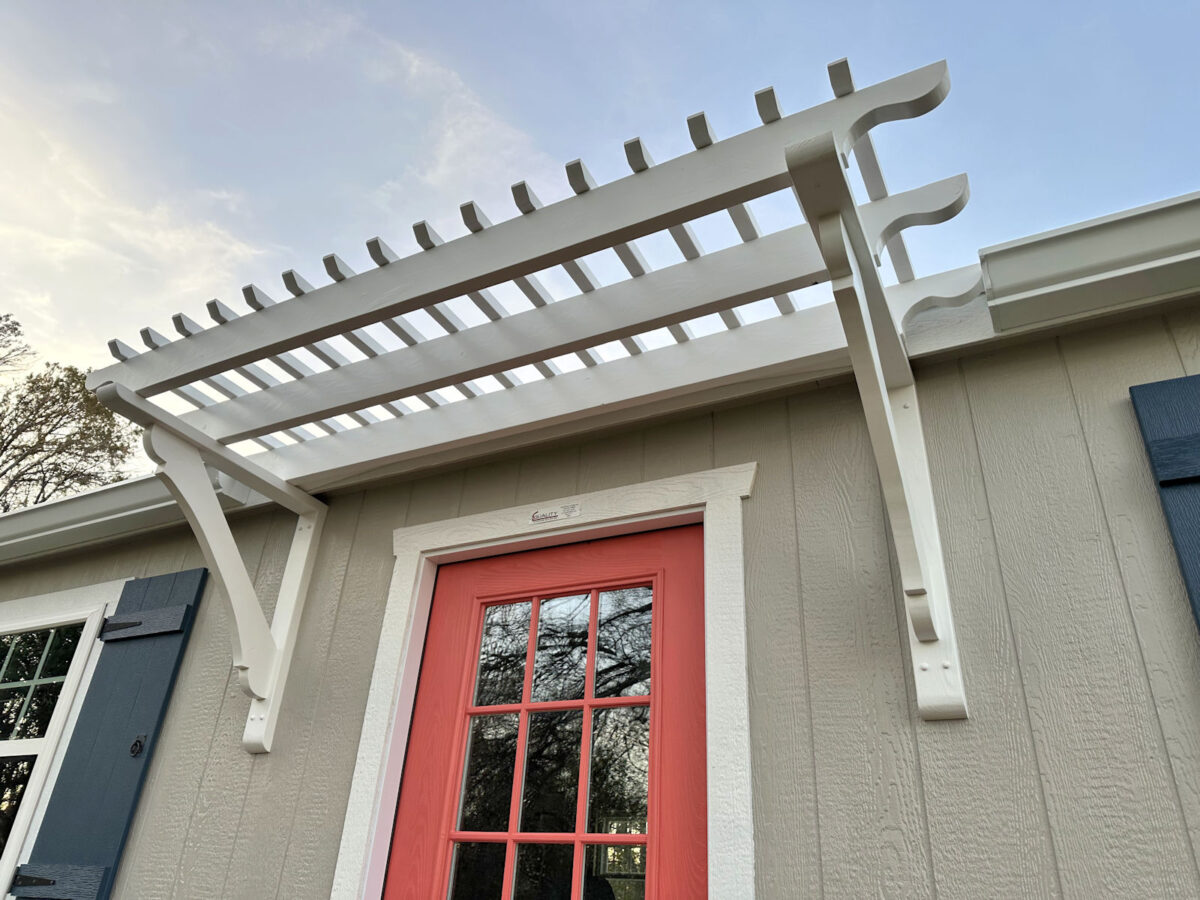
There are nonetheless these 6-ish inches on both sides the place the rain can come off of the roof and are available straight down, however I don’t assume that’s an enormous concern.

I used to be already planning to place some potted vegetation on both facet of the steps anyway, so now they’ll get watered every time it rains.

This undertaking would have been a lot simpler with a helper, however I’m a really impartial individual. I just like the problem of doing issues myself.

That typically implies that I’ve to construct issues in place, which provides to the problem. However I’m at all times up for a problem. And there’s simply one thing about with the ability to say that I did a undertaking all on my own.

So with this undertaking accomplished, I’m going to show my consideration to the bed room suite for now. I wish to get the flooring put in and completed, however then I’ll want to present the flooring just a few days to remedy after it’s stained and sealed earlier than persevering with any work on the bed room suite.

So I would use that point (relying on the climate) to complete up the caulking and portray of the entire PVC tasks and get the world across the workshop mulched. However for now, I simply love coming exterior and seeing my cute little workshop in our again yard.

So simply as a reminder, right here’s how the workshop appeared proper after it was constructed final fall.
And right here’s what it appears to be like like now.
It’s shaping as much as be the little yard cottage workshop of my goals!
If you wish to sustain with my 2025 record of dwelling objectives (and my progress with hyperlinks to completed tasks!) you possibly can see that right here: 2025 Grasp Record of Residence Objectives

Addicted 2 Adorning is the place I share my DIY and adorning journey as I transform and embellish the 1948 fixer higher that my husband, Matt, and I purchased in 2013. Matt has M.S. and is unable to do bodily work, so I do nearly all of the work on the home on my own. You’ll be able to study extra about me right here.


: Bids push home sale in Port Moody nearly 0,000 over listed price")